
Want to make your website stand out from the crowd and grab instant attention from your website visitors? Then you should definitely use the Elementor’s Custom Font feature. Incorporating custom fonts on your website will not only make your website appealing but will also help it to look different typographically.
Though the Elementor page builder offers 800+ Google fonts to choose from, sometimes they are not sufficient for you, or you just want to take your web design experience to the next level by using fonts apart from the standard Google fonts.
So, in this tutorial, we will guide you to create your own custom fonts in Elementor so that you can set up your brand recognition.
Table of Contents
Key Takeaways
- Custom fonts differentiate your site from competitors, enhance aesthetics, and improve your overall design impact.
- Learn why custom fonts are important even when Elementor offers 800+ Google Fonts—enhance your brand identity and stand out from the crowd.
- Understand which font formats are compatible with Elementor to ensure browser compatibility.
- Learn how to upload different weights and styles (bold, italic, etc.) for the same font for maximum design flexibility.
- Once uploaded, discover how to use your custom fonts in any Elementor widget using typography settings.
What are the Benefits of Using Custom Fonts on Your Website
There might be a question that would arise in your mind, that if Elementor offers 800+ font styles which I can directly implement without any hassle, so what is the need to use extra custom fonts.
The answer to the question is that if you want to make a difference and earmark the uniqueness that separates you from the rest of the crowd, then you can simply achieve this by using customized fonts in Elementor.
What Font Formats Can You Upload in Elementor?
- The Web Open Font Format (WOFF): WOFF is the most recommended format to use since it is supported by all modern browsers.
- The Web Open Font Format (WOFF 2.0): TrueType/OpenType font that provides better compression than WOFF 1.0.
- TrueType Fonts (TTF): This font was developed in the late 1980s, by Apple and Microsoft.
- SVG Fonts/Shapes: SVG fonts allow SVG to be used as glyphs when displaying text. Make sure to use this format to support old versions of the iPhone.
- Embedded OpenType Fonts (EOT): This font file works on IE, but not on other browsers. Make sure to use this format to support earlier versions of IE.
How To Add Custom Fonts in Elementor
Elementor Pro provides you with the feature to implement custom fonts on your website without using any 3rd party addon and without writing any code. To allow visitors to see your customized font styles, the font should be uploaded to your WordPress website as a standard format.
With Elementor, you can create custom fonts for the various font formats that provide support to the various web browsers.
So, without any further delay, let’s dive into the steps to add custom fonts in Elementor.
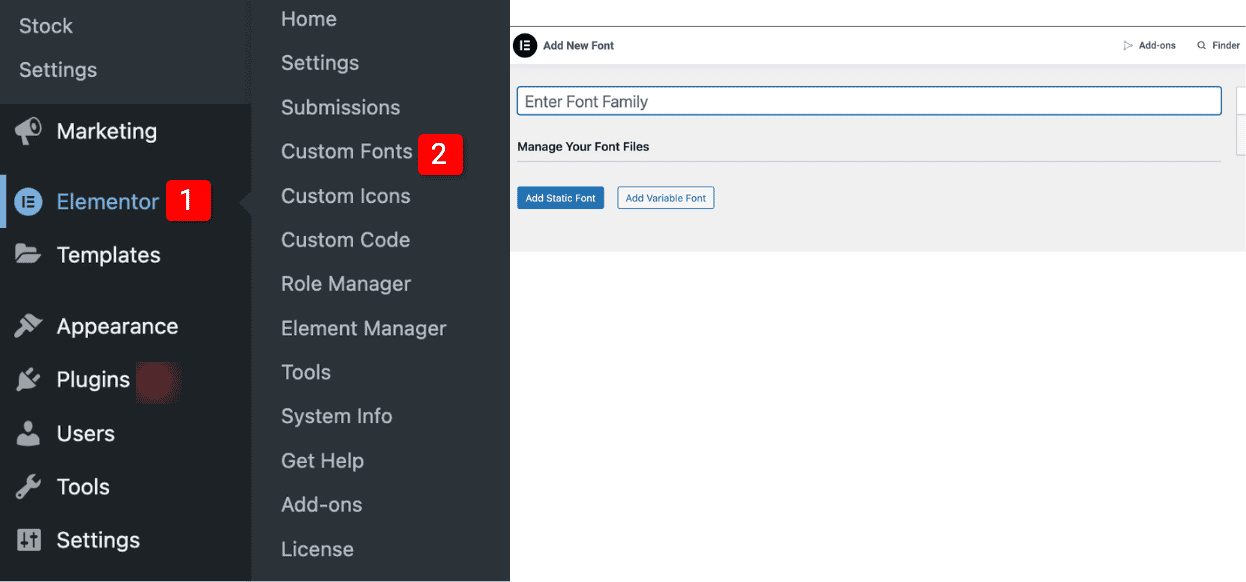
Step 1: Open Custom Fonts Settings
- To begin, go to the WordPress admin dashboard and navigate to the Elementor -> Custom Fonts and then click on Add New.
Step 2: Add Font Name and Upload Files
- Next, enter the respective font name and upload its WOFF, WOFF2, TTF, SVG, or EOT files.
Note: It is recommended to upload the font files in all the standard formats to make it compatible with all the browsers. Otherwise, the fonts will not appear on different browsers.

You can also add different font variations to the same font, like Weight and Style, and easily use them as you need. For each font variation that you are adding, you will have to upload its respective font files individually.

Step 3: Publish the Font
After you are done uploading all the files and setting up variations, simply click on the Publish button, and you are all set.
Once the files are uploaded, they will be available in the typography controls of every widget that controls the text.
How to Apply Custom Fonts in Elementor Widgets?
Once your font is published:
- Open any page using Elementor Editor.
- Add or edit the widget that contains text.
- Go to the Style tab → Typography.
- In the Font Family dropdown, choose your custom font.
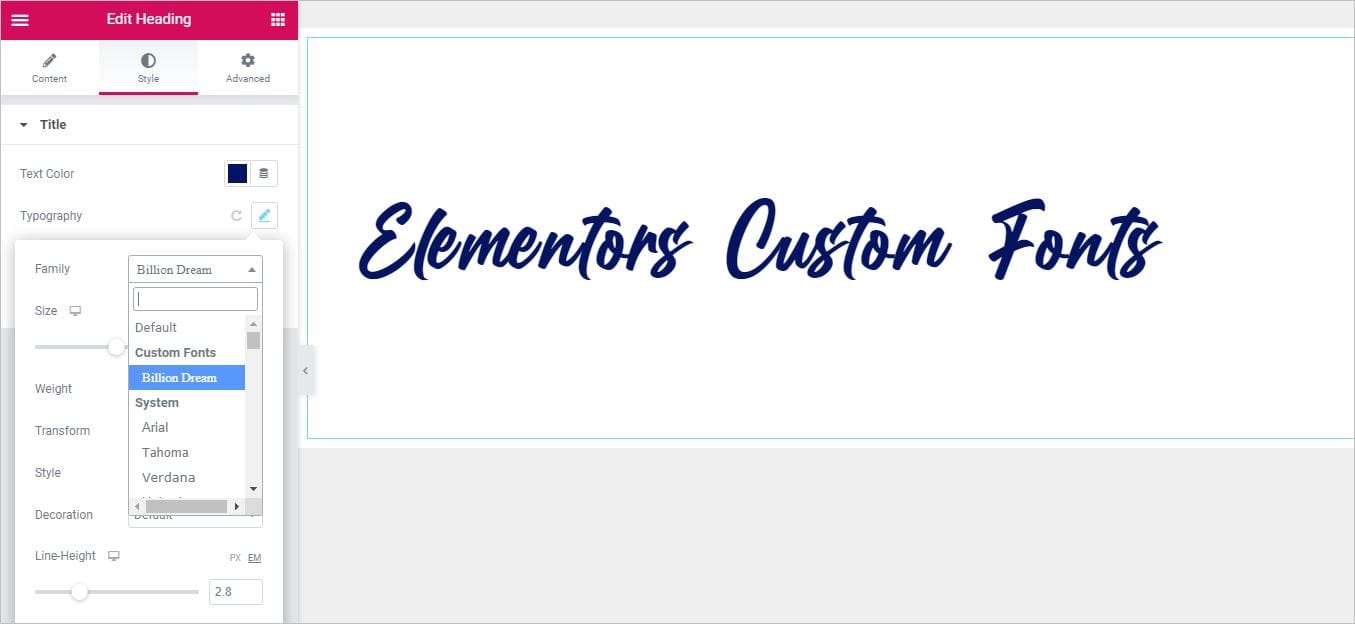
That’s it! All your custom fonts are ready, and you can use them anywhere on your website.
Ready to Try Custom Fonts in Elementor?
Using custom fonts in Elementor is a simple yet powerful way to elevate your web design and strengthen your brand identity. While Google Fonts are great, custom fonts give you full creative control and help your site look truly one of a kind.
So go ahead—follow the steps in this guide and make your website stand out with unique typography that reflects your style.
FAQs on Adding Custom Fonts in Elementor
Do I need Elementor Pro to use custom fonts?
Yes, the custom fonts feature is available only in Elementor Pro.
What file types should I upload for best browser support?
It’s recommended to upload your font in WOFF, WOFF2, TTF, SVG, and EOT formats to ensure compatibility with all modern and older browsers.
Where will the custom font appear after publishing?
Once published, the custom font will be available in Typography settings across all Elementor widgets that support text customization.
Can I use the custom font in all Elementor widgets?
Yes, you can use custom fonts in all Elementor widgets that support text.


Hi. Is it a good idea to load the entire font family (10 styles) at once? Or only the ones I know I will definitely use?
Hi
If you are sure that you only need particular styles, then it is good to load only the required one.