Imagine you’re running a business that serves customers from different countries—maybe you sell products online, run a hotel, or manage an international school. Naturally, you want your website to speak the language of your visitors, whether it’s English, Spanish, French, or any other. A multilingual website makes it easier for people to understand your services and builds trust.
Now, you might think of using tools like Google Translate to add multiple languages, but that often leads to awkward or incorrect translations—not ideal for professional websites. Setting up separate websites for each language is also an option, but managing them can get messy and time-consuming.
That’s where WPML (WordPress Multilingual Plugin) comes in. It’s a powerful way to turn your WordPress website into a multilingual one—all from a single dashboard. No need for multiple sites or complicated setups. WPML lets you translate your pages, posts, and even plugin and theme content easily. It also adds a language switcher for your visitors so they can choose the language they prefer.
In this article, we’ll walk you through what WPML offers and how you can use it with Elementor to build a smooth and professional multilingual website with ease.
Table of Contents
Key Takeaways
- Learn why creating a multilingual WordPress site is essential for reaching global users, improving user experience, building trust, and boosting SEO.
- Understand how WPML simplifies the process of turning your site into a multilingual one—without needing multiple websites or unreliable auto-translation tools.
- Get step-by-step guidance on installing WPML and integrating it with Elementor to build multilingual pages and templates.
- Choose between manual translation, automatic translation using WPML credits, or assigning tasks to translators or a translation manager.
- Discover how to translate posts, pages, categories, tags, menus, and even theme/plugin text using WPML’s String Translation and Taxonomy Translation tools.
- See how to add and customize a WPML Language Switcher within Elementor templates (like the footer) for easy visitor access to language options.
Why Should We Create a Multilingual Website using WPML
Creating a multilingual website using the WPML plugin opens the door to a global audience and boosts your online presence. Here’s why using WordPress translation tools like WPML is a smart move:
- Reach a Global Audience: Break language barriers and connect with users worldwide. A multilingual website attracts international traffic and expands your market reach.
- Boost User Experience: Visitors feel more comfortable and engaged when they can read content in their native language. WPML ensures smooth website localization and intuitive navigation.
- Build Credibility & Trust: Presenting content in multiple languages reflects professionalism and shows respect for different cultures, enhancing your brand’s global image.
- Improve SEO Performance: WPML optimizes translated content for search engines, boosting your visibility in local search results and driving organic traffic from different regions.
- Simplify Content Management: Translate posts, pages, menus, and custom fields directly from the WordPress dashboard using WPML’s intuitive translation editor.
How to Create a MultilingualvvvvWordPressbghtyftuy67 8hkmgbsotj9[hgfojtkhp;lffy Website Using WPML
Plugins Install
To create your multilingual website, you’ll need the following plugins:
- Elementor(Free or Pro)
- WPML(WordPress Multilingual)
Install WPML Plugin
Note: WPML is a paid plugin, but it’s the best choice because it offers a lot of features. Many websites use WPML to make a multilingual WordPress site, so there’s a good reason for its popularity.
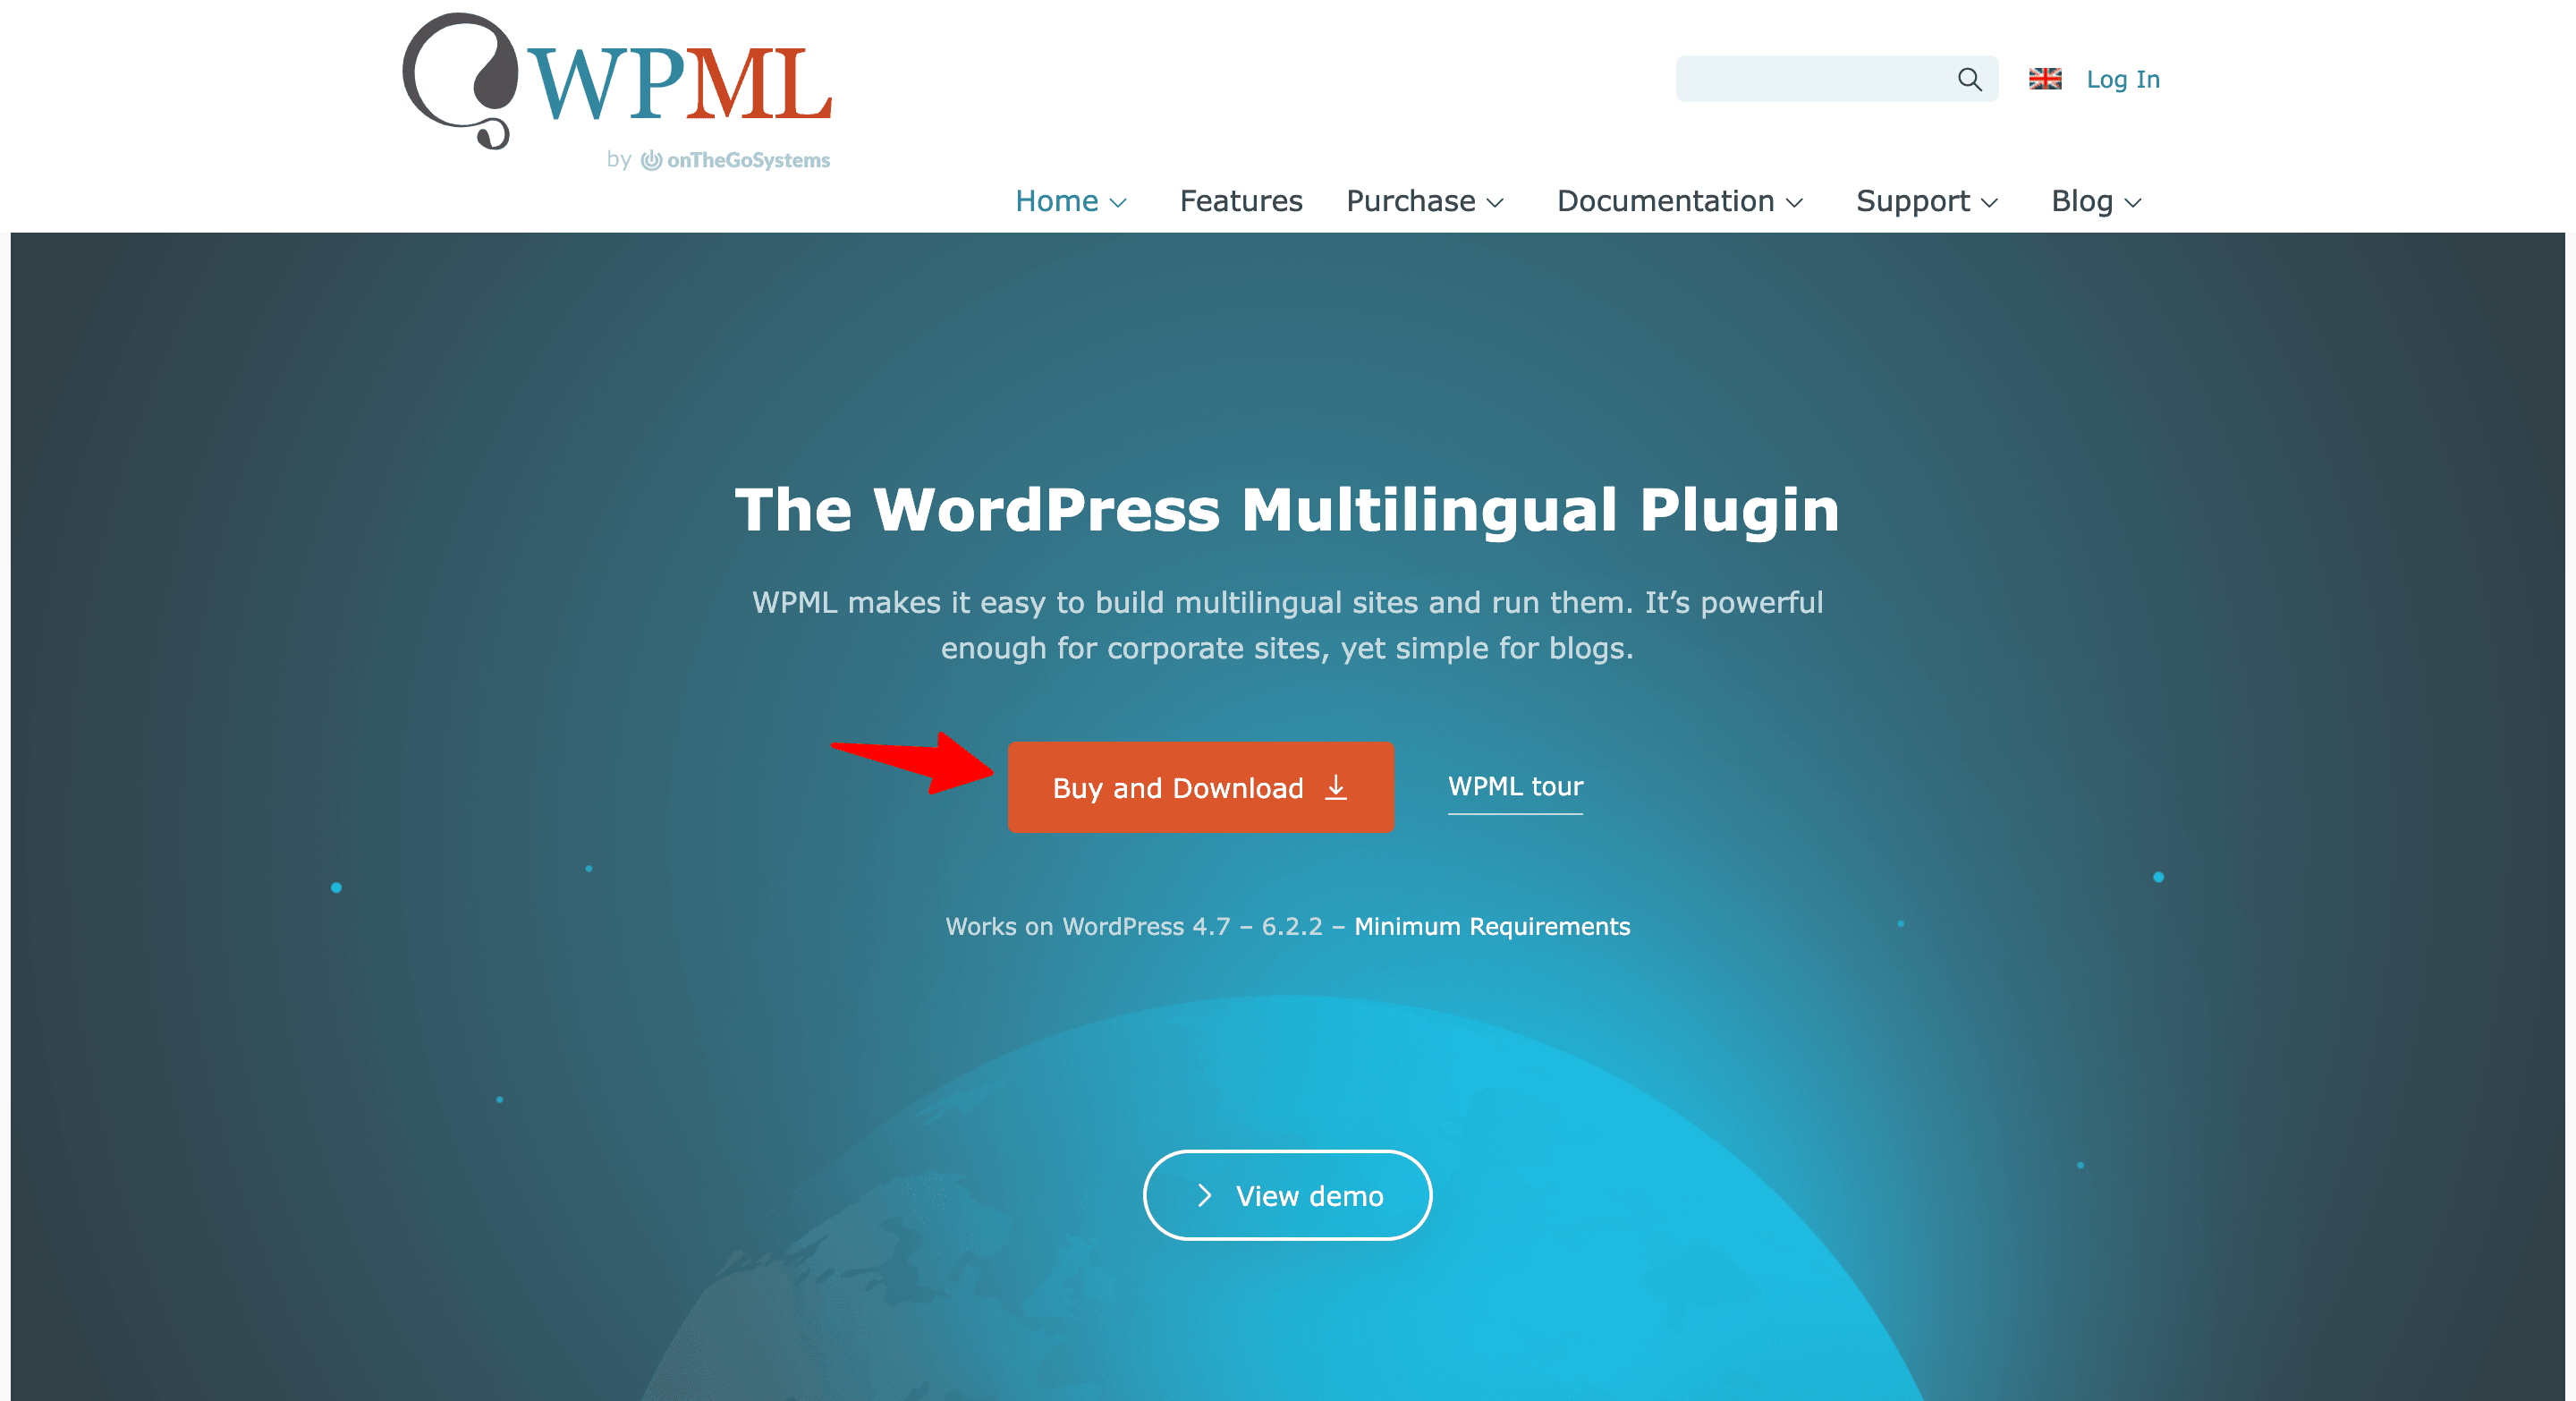
You can install and activate this plugin directly from the WPML website.
Once the plugin is installed and activated, it will add a new menu item named ‘WPML‘ to your WordPress menu. Clicking on this menu item for the first time will lead you to the plugin’s settings wizard.
Configure WPML Setup
To configure the WPML setup, navigate to WPML -> Setup.
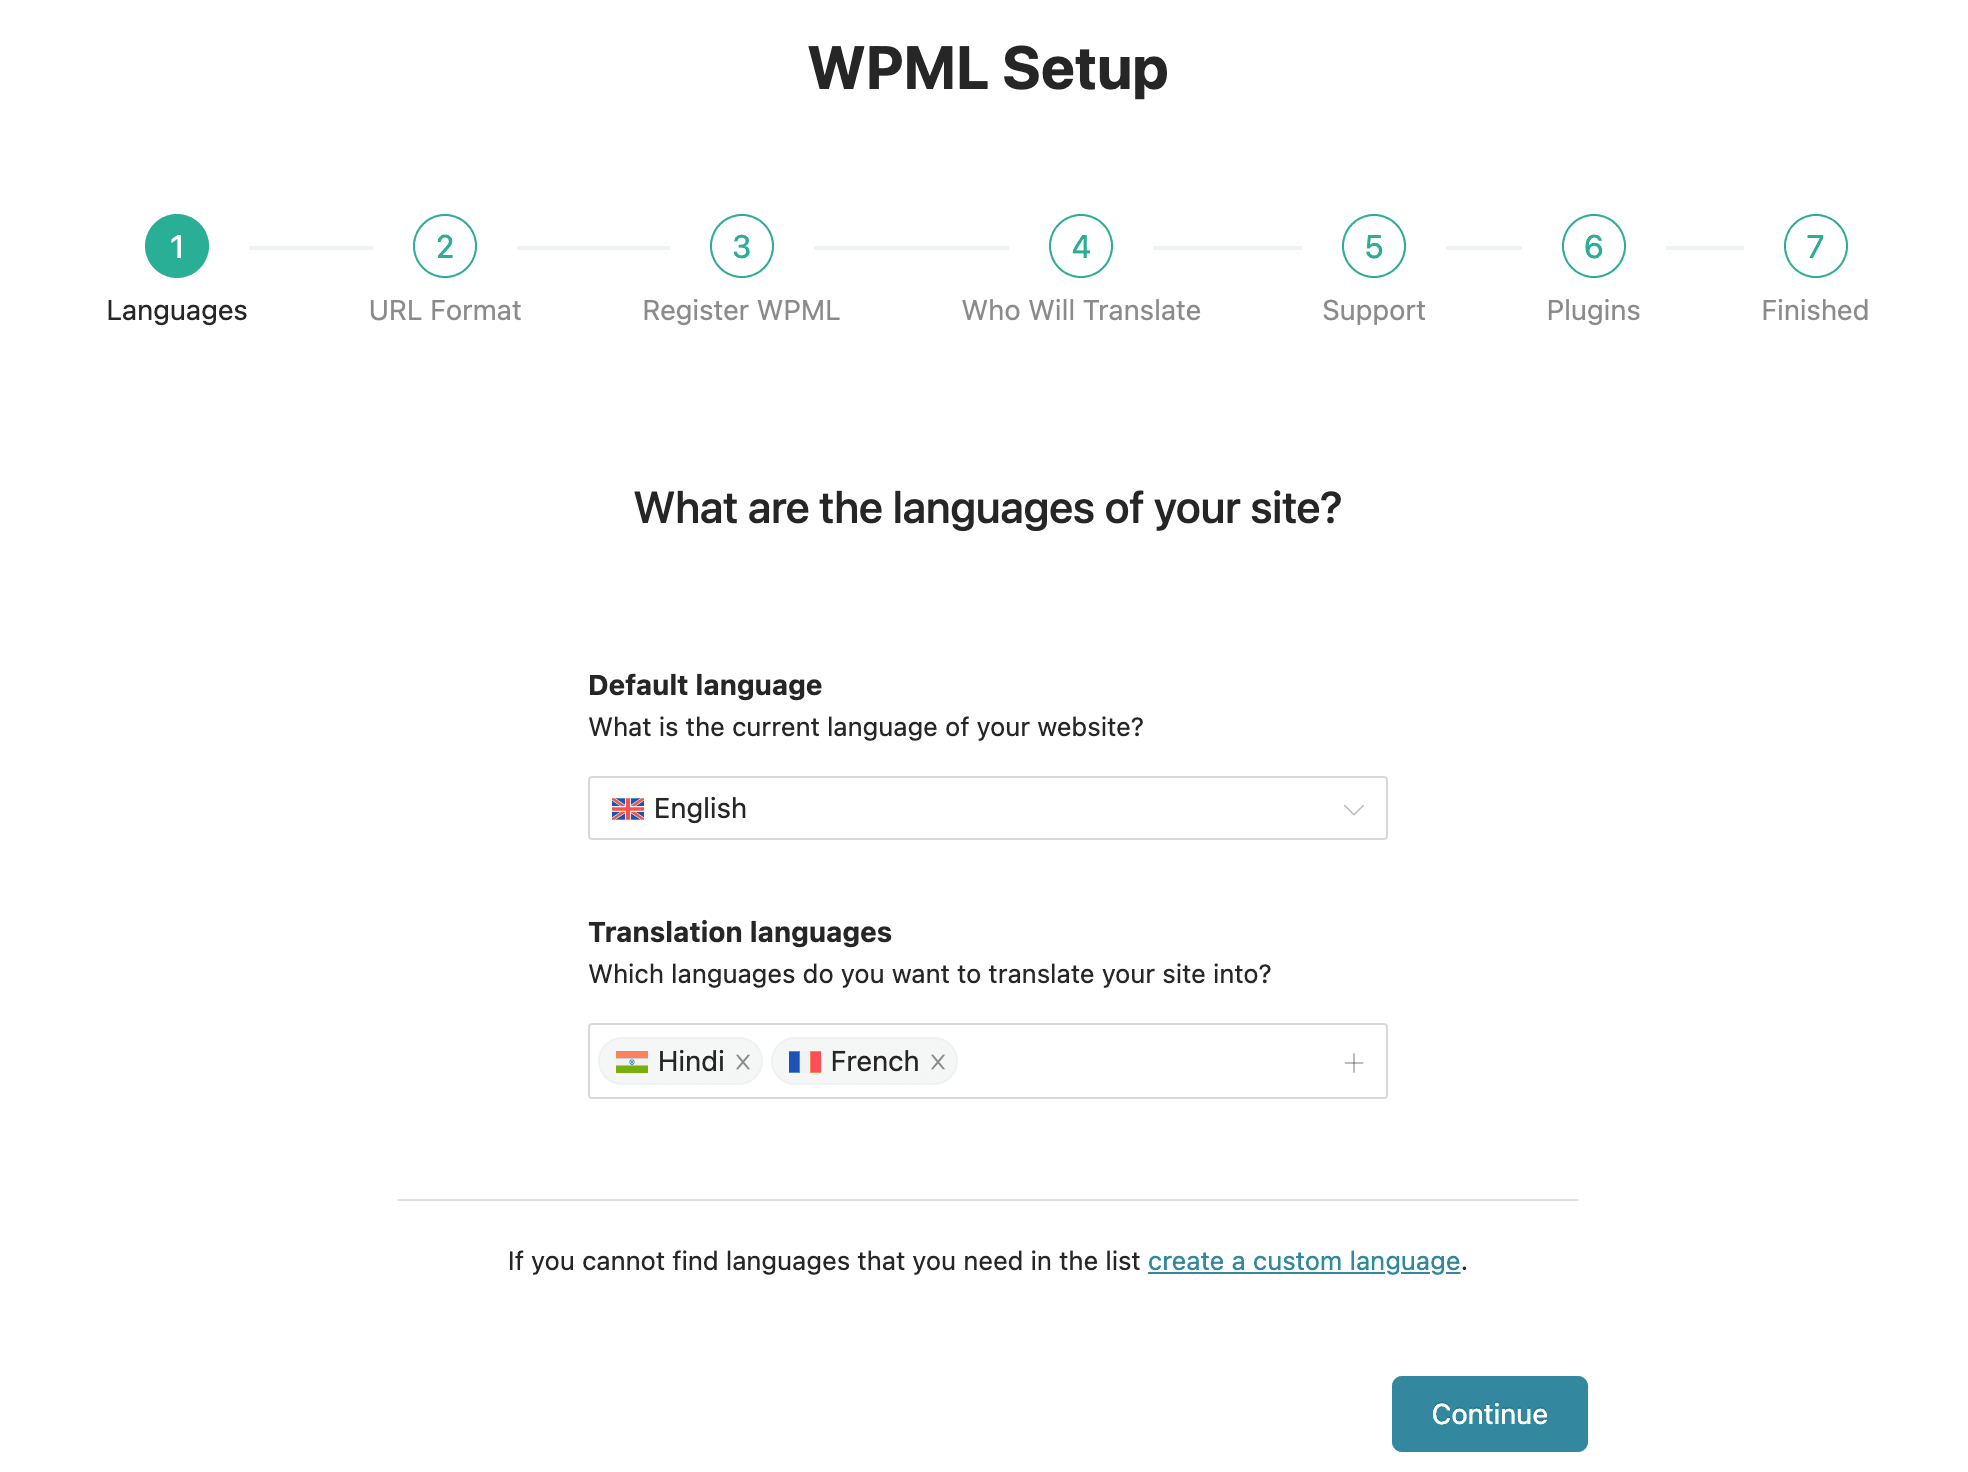
Language
WPML will detect the language of your WordPress site automatically. You can adjust it here if you wish. Below that, you should pick the additional languages you want for your website. You can add more languages later if necessary.
Then, simply click the Continue button to move on to the next step.
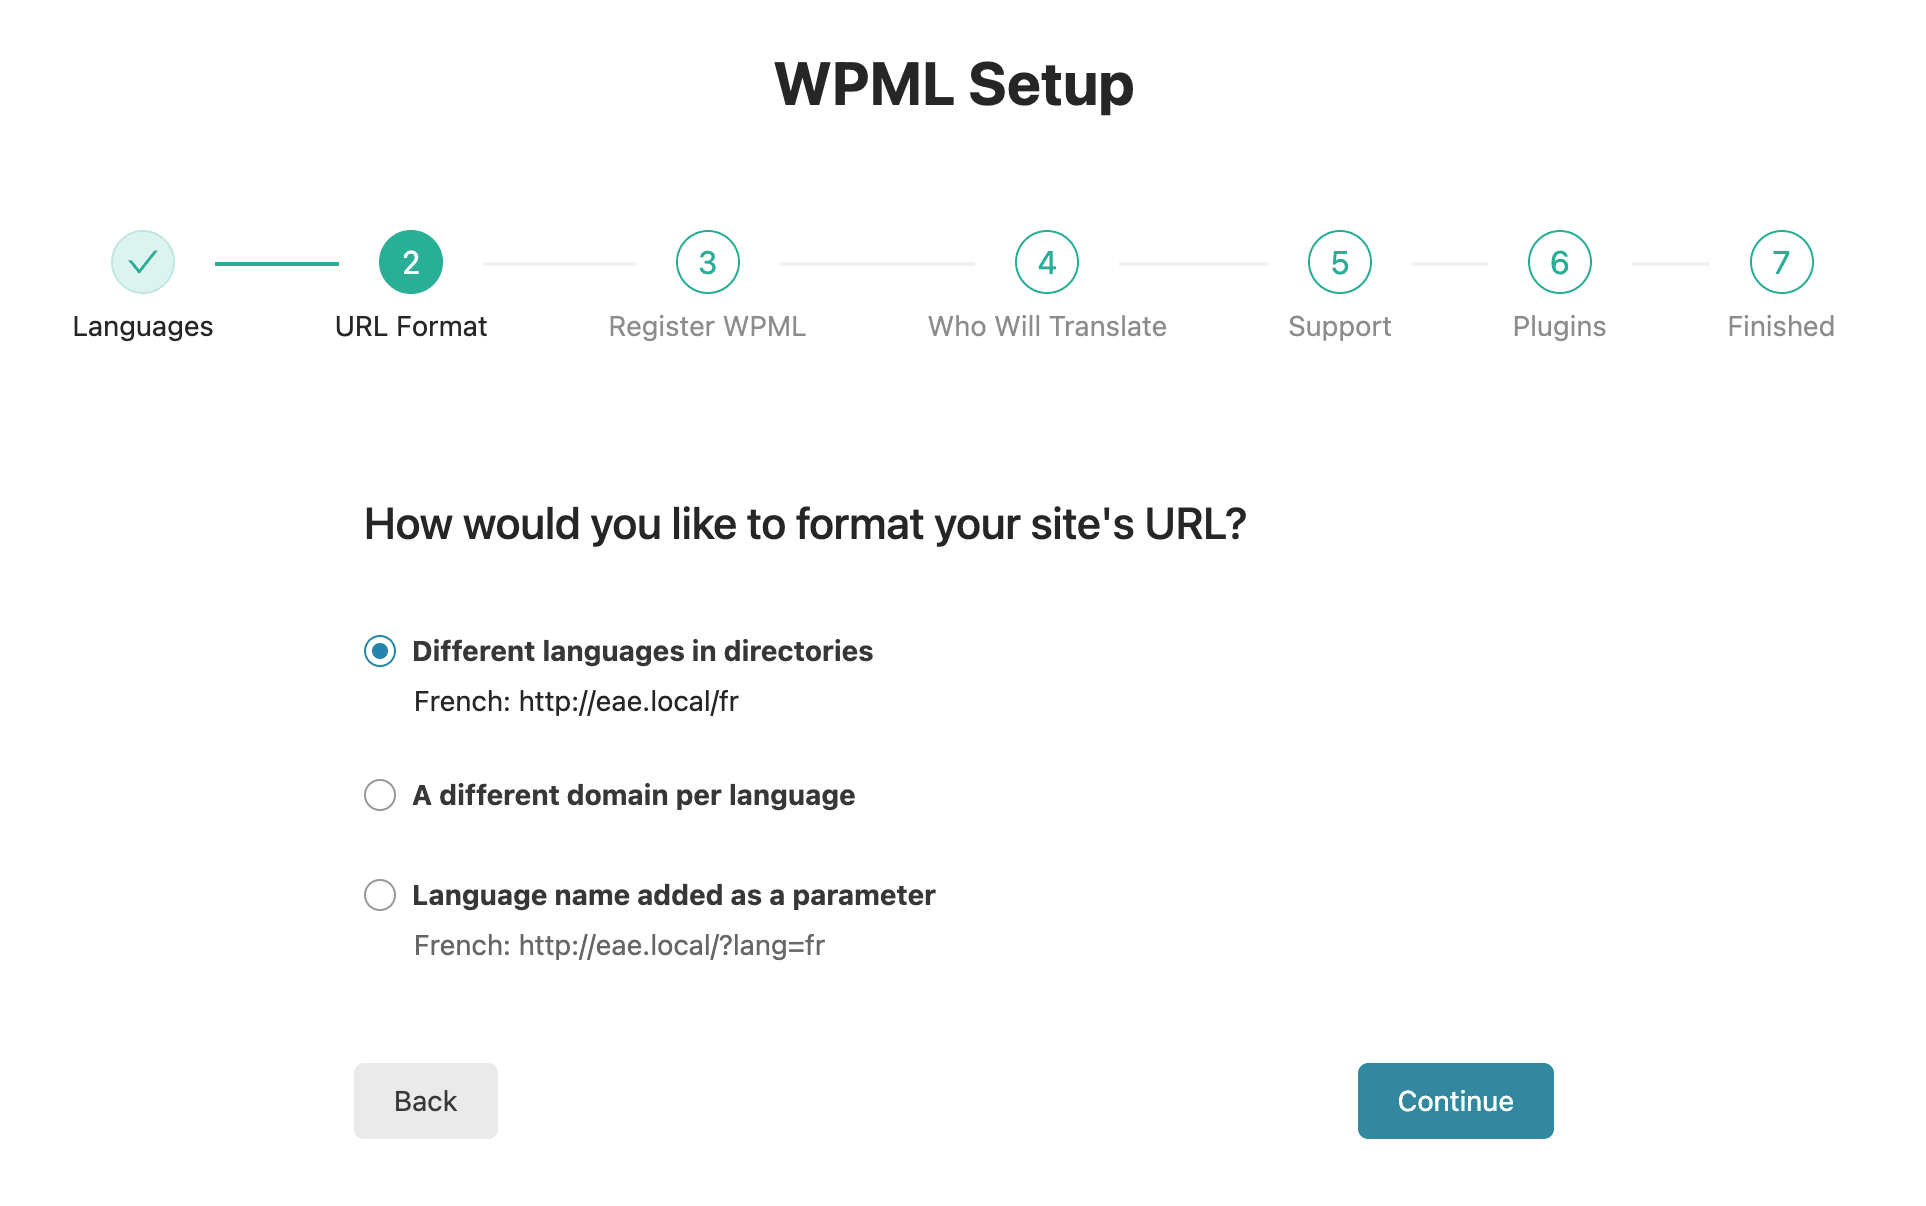
URL Format
You have different choices for how you want to set up the URL format. You can use a directory structure, separate domains, or subdomains for each language.
The best choice for most websites is the directory structure. It’s better for SEO.
If you want each language to look like a separate website, you can choose subdomains or separate domains. But remember, Google might treat them as different websites. So, only choose this if it’s your plan.
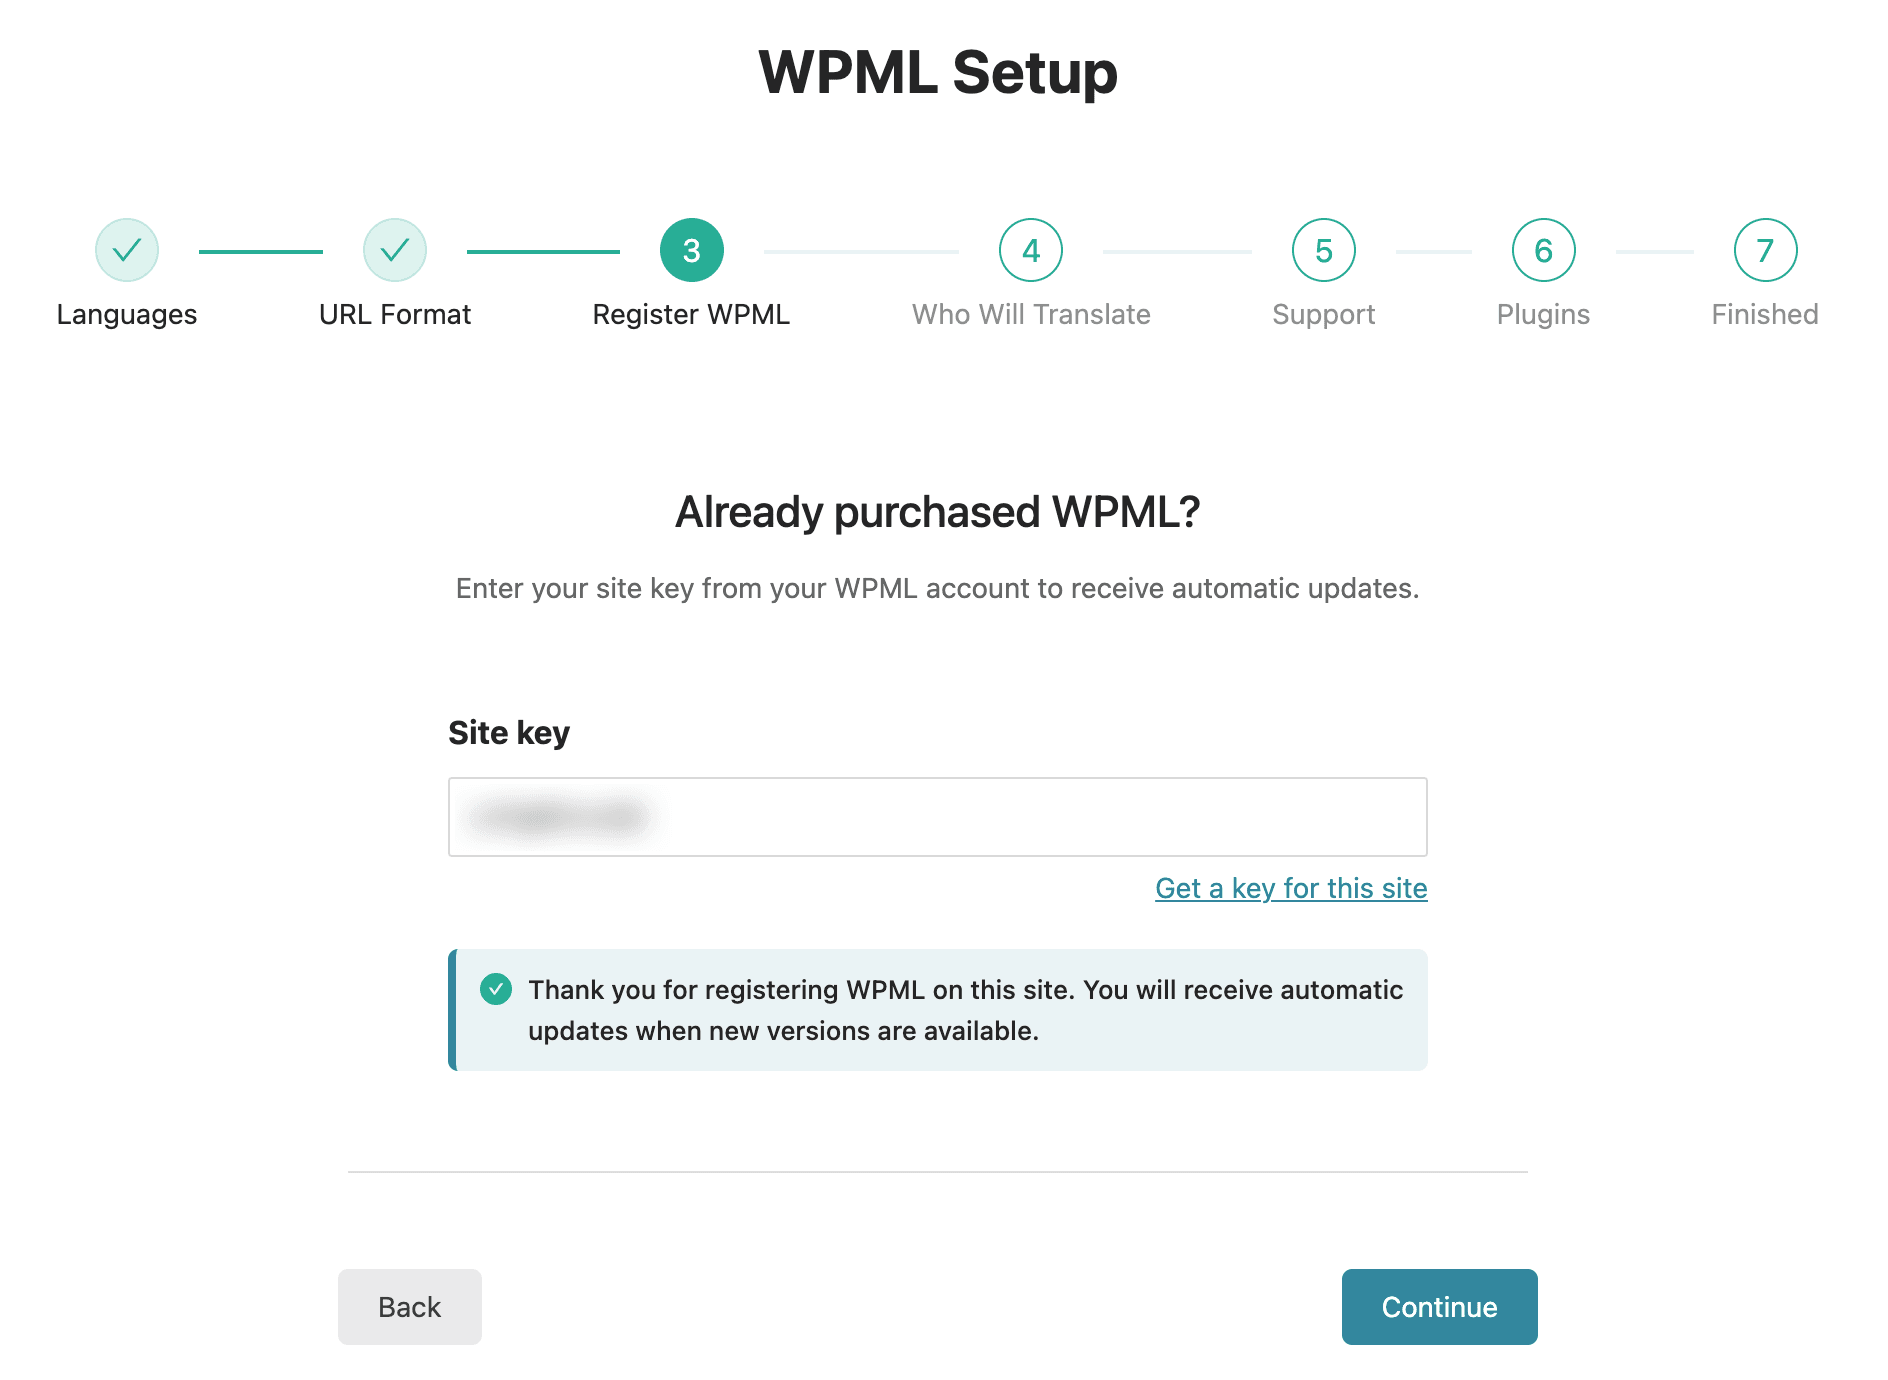
Register WPML
Now, the plugin will prompt you to enter the Site Key. You can find this key in your account on the WPML website.
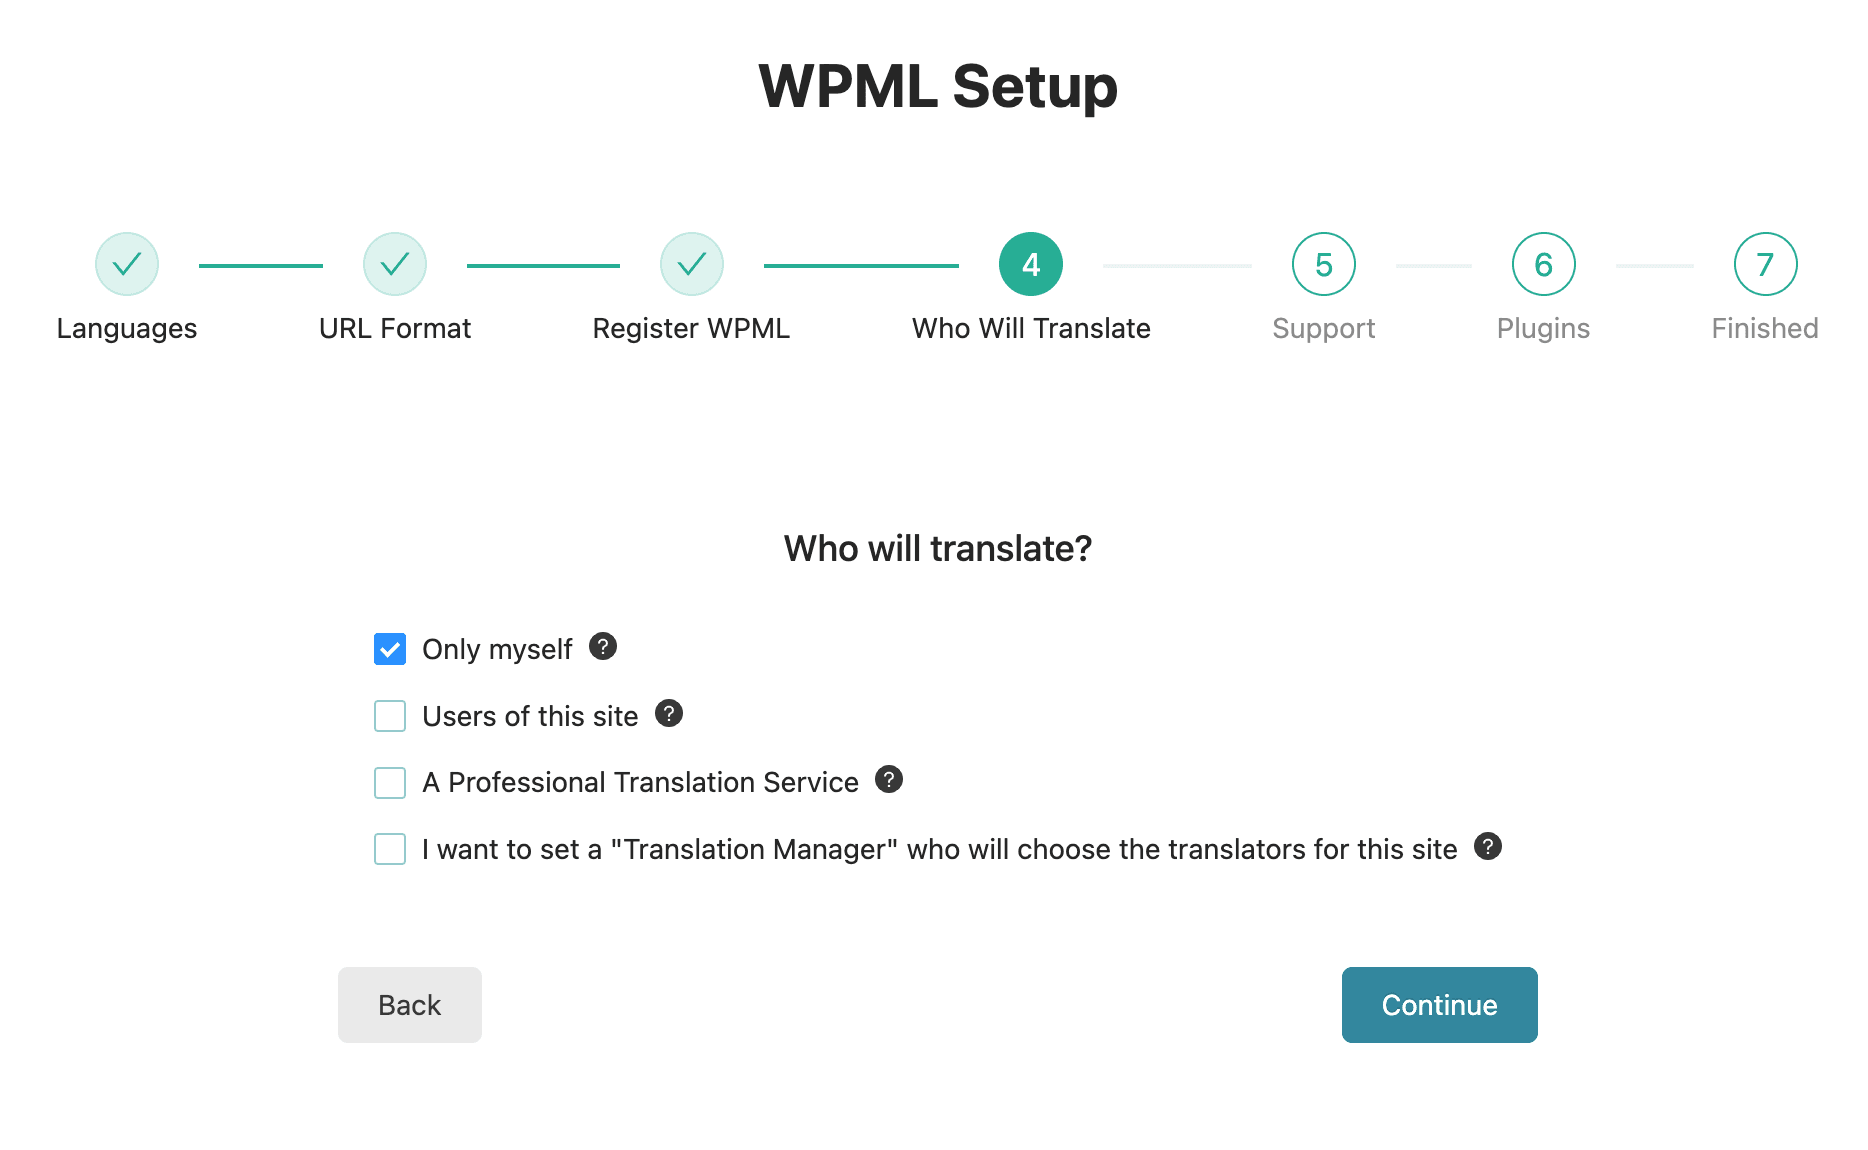
Who will Translate
Then, you’ll need to choose how you want your website to be translated.
You have several options: translate yourself, involve website users, bring in specific translators or a translation manager, or go for a professional translation service.
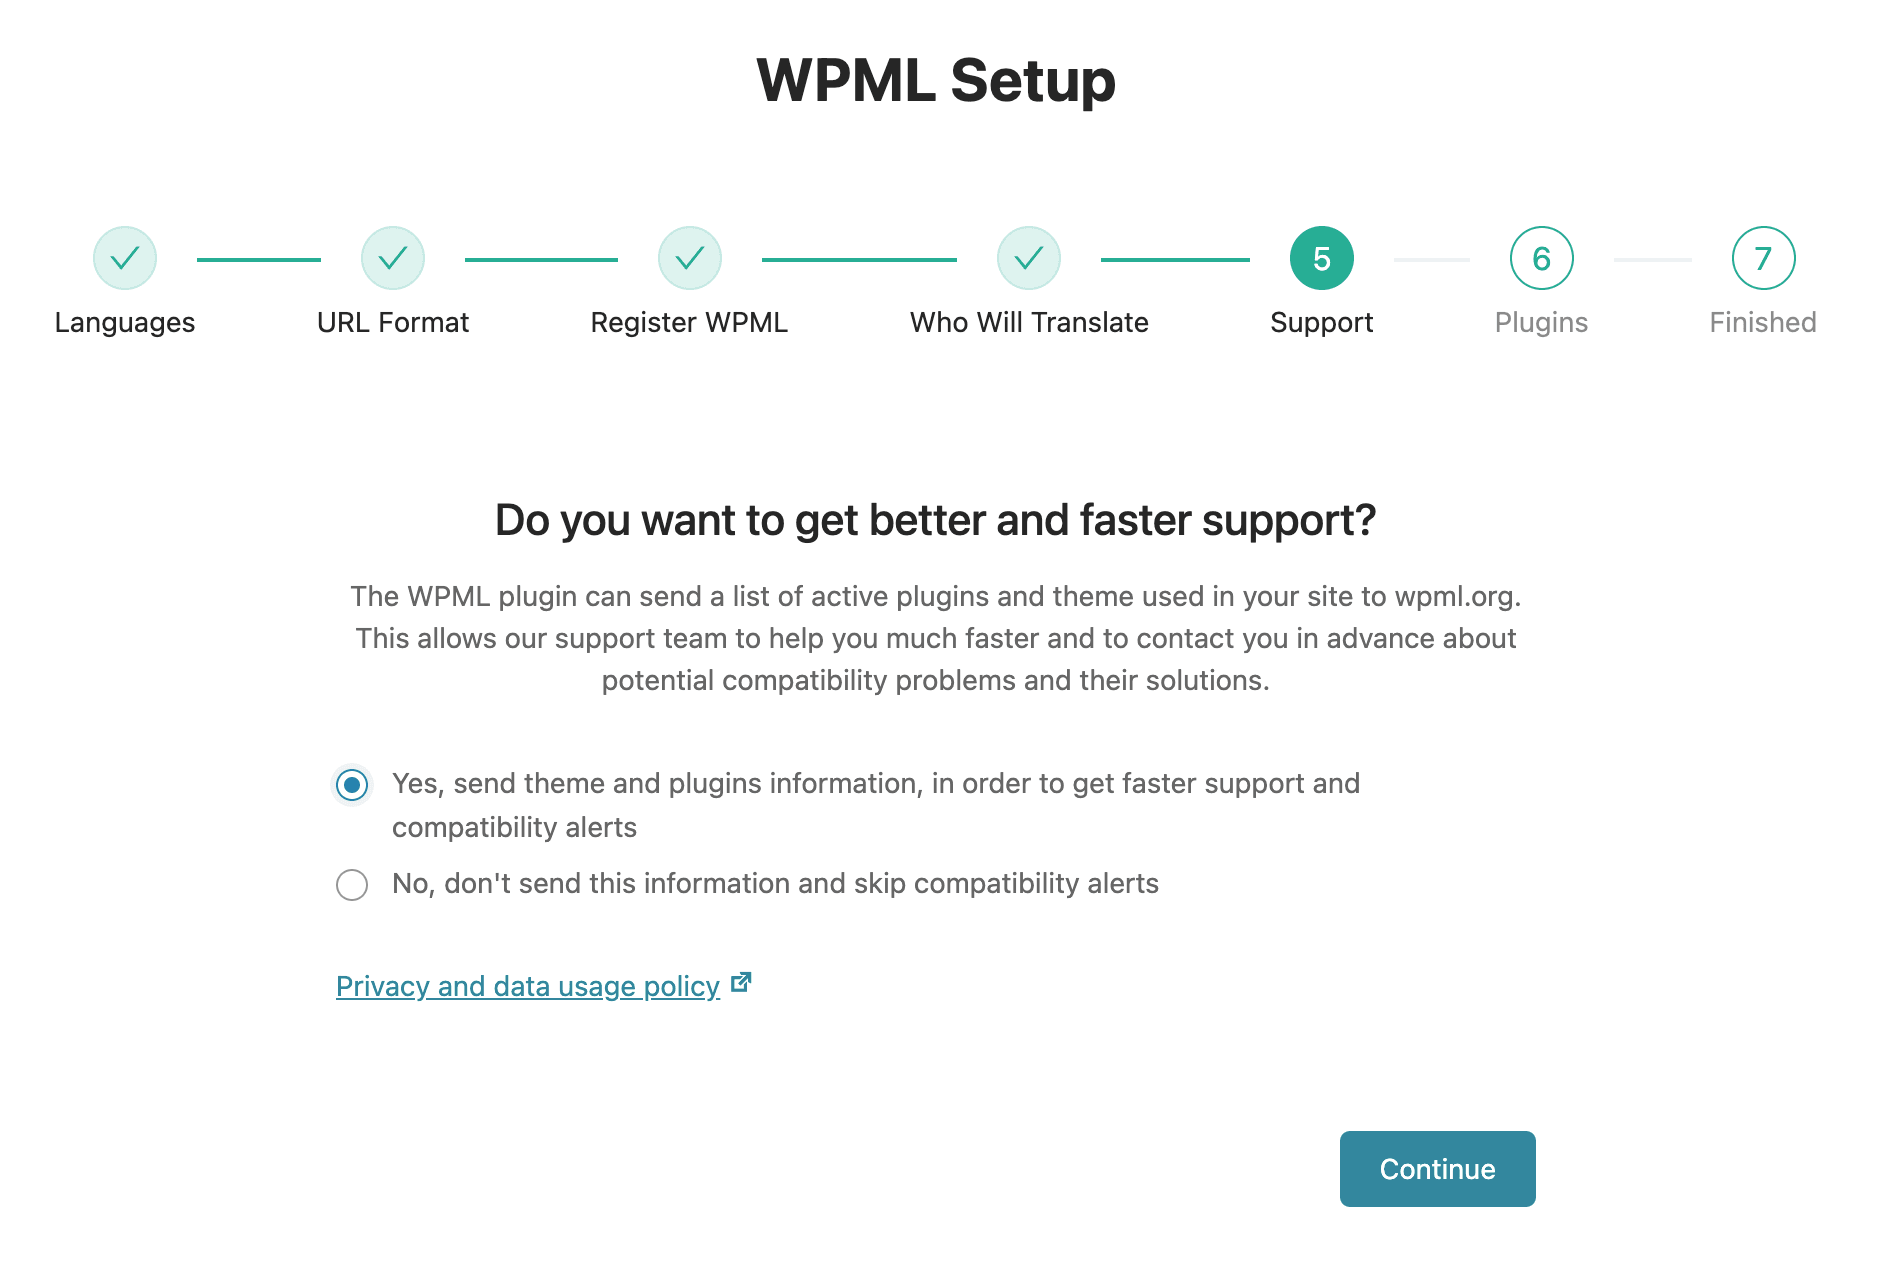
Support
In the other step, you have the option to grant permission to share plugin and theme details. This enables quicker support assistance if required.
Plugins
Following that, WPML will request your approval to install additional useful plugins. You can skip this for now and decide to install these plugins at a later time.
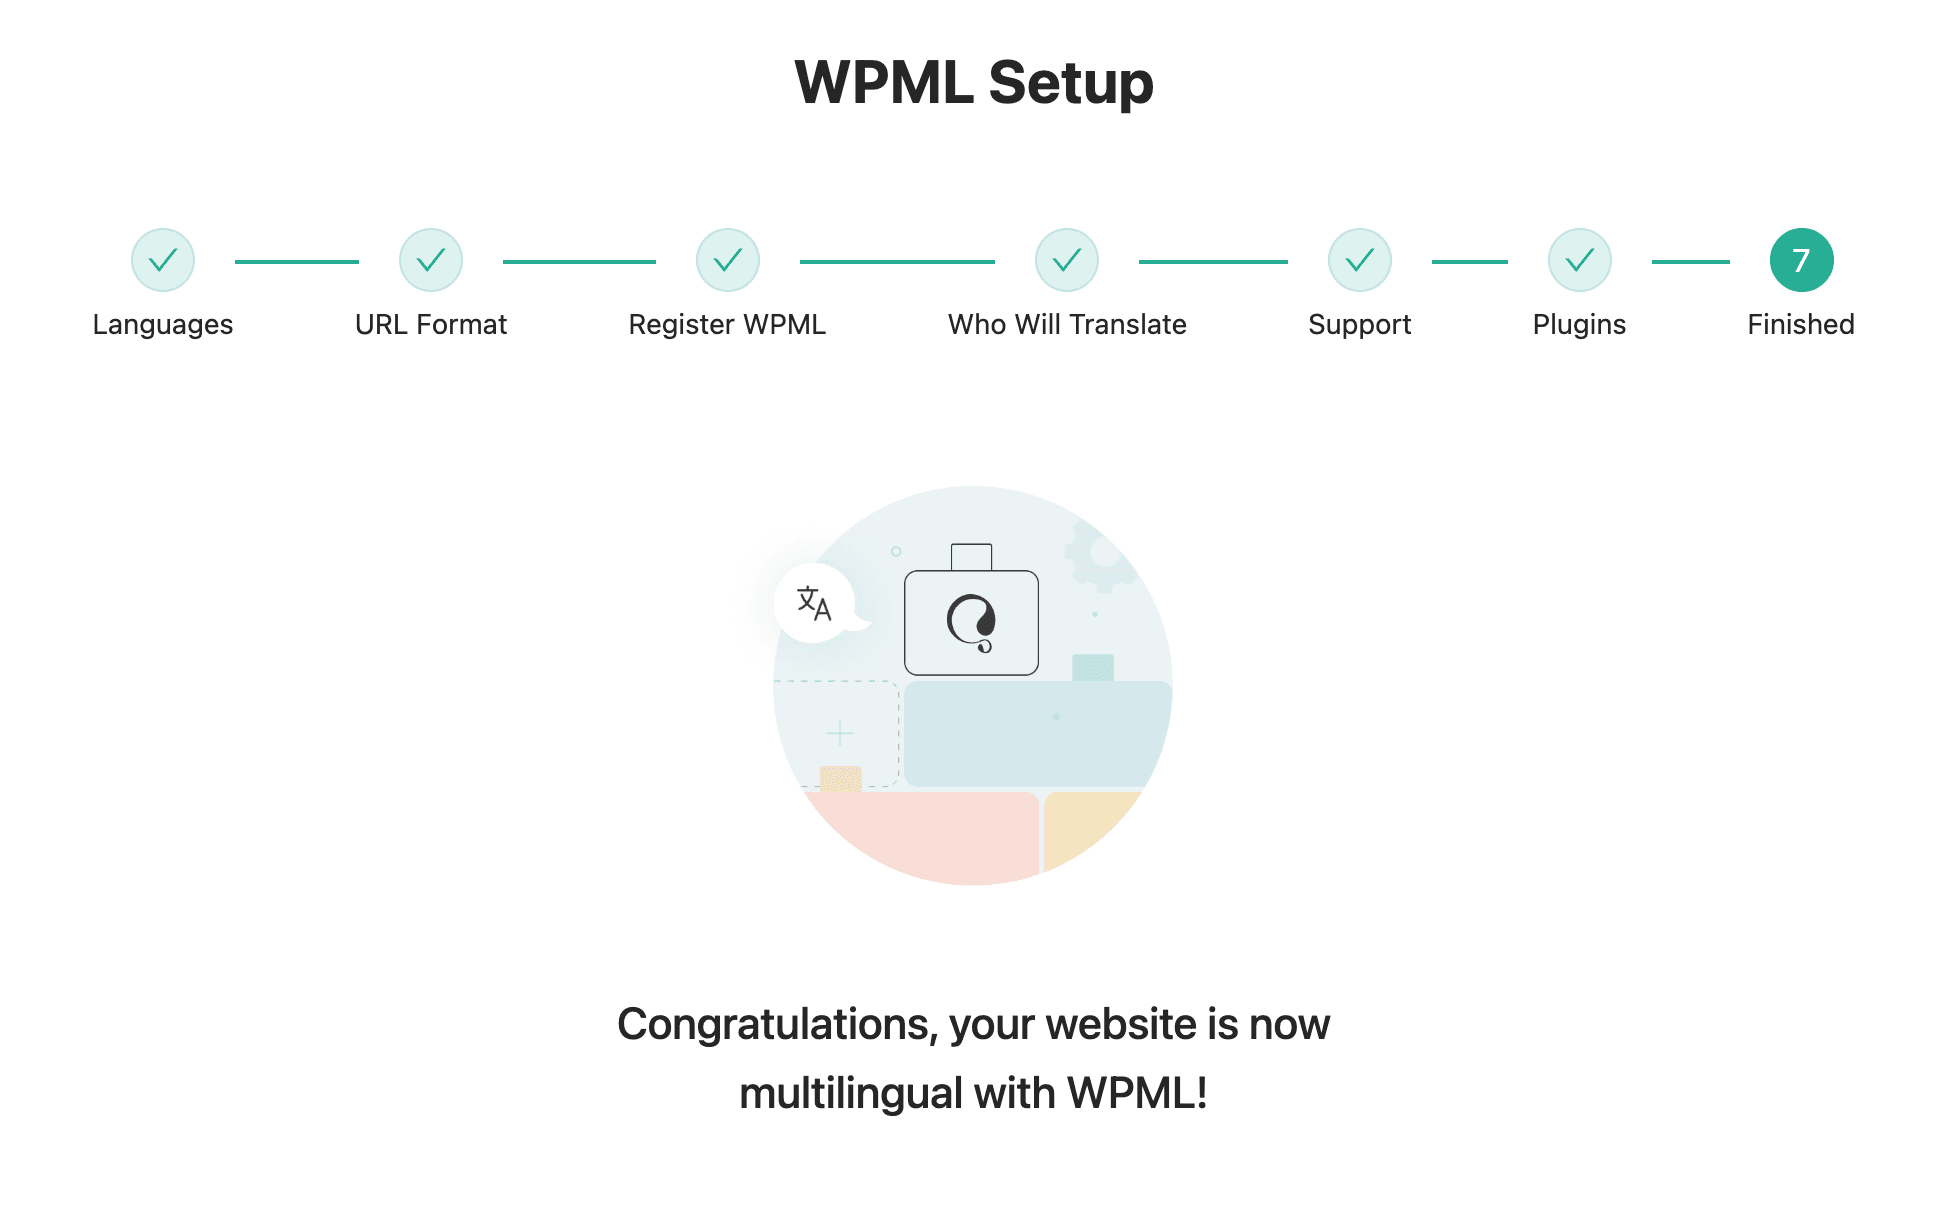
Finished
Congratulations! You’ve now successfully configured WPML to create and oversee your multilingual website.
The next step involves adding the translated content to your website.
How Can You Integrate Multilingual Content into WordPress Using WPML?
WPML simplifies the process of translating all aspects of your WordPress website into multiple languages.
You can effortlessly translate your WordPress pages, posts, tags, categories, and themes into many languages according to your preferences.
Integrate Multilingual Pages & Posts
First, we’ll begin by translating the pages and posts on your site. Translating the content of these posts is straightforward.
We’ll go over three easy methods for translating your posts and pages. Here are the steps to follow for each method.
Method 1: Using WPML Translation Management
If you want to translate your content with WPML, you can do it all in one place. Whether it’s posts, pages, categories, or other types of content, WPML makes it easy to translate everything. You also have the option to translate the full site automatically in a single click.
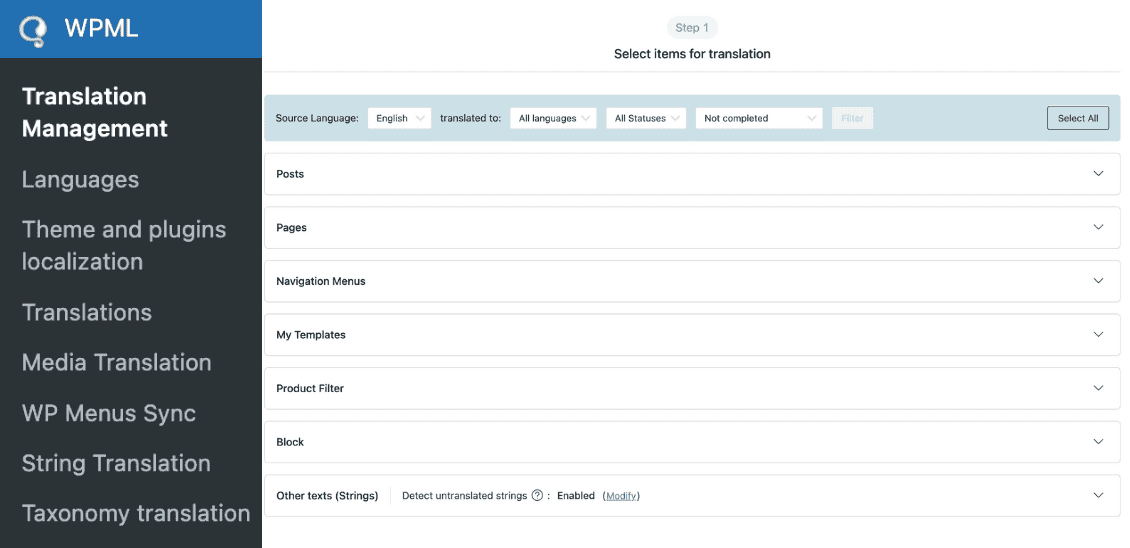
To get started, go to WPML and click on Translation Management.
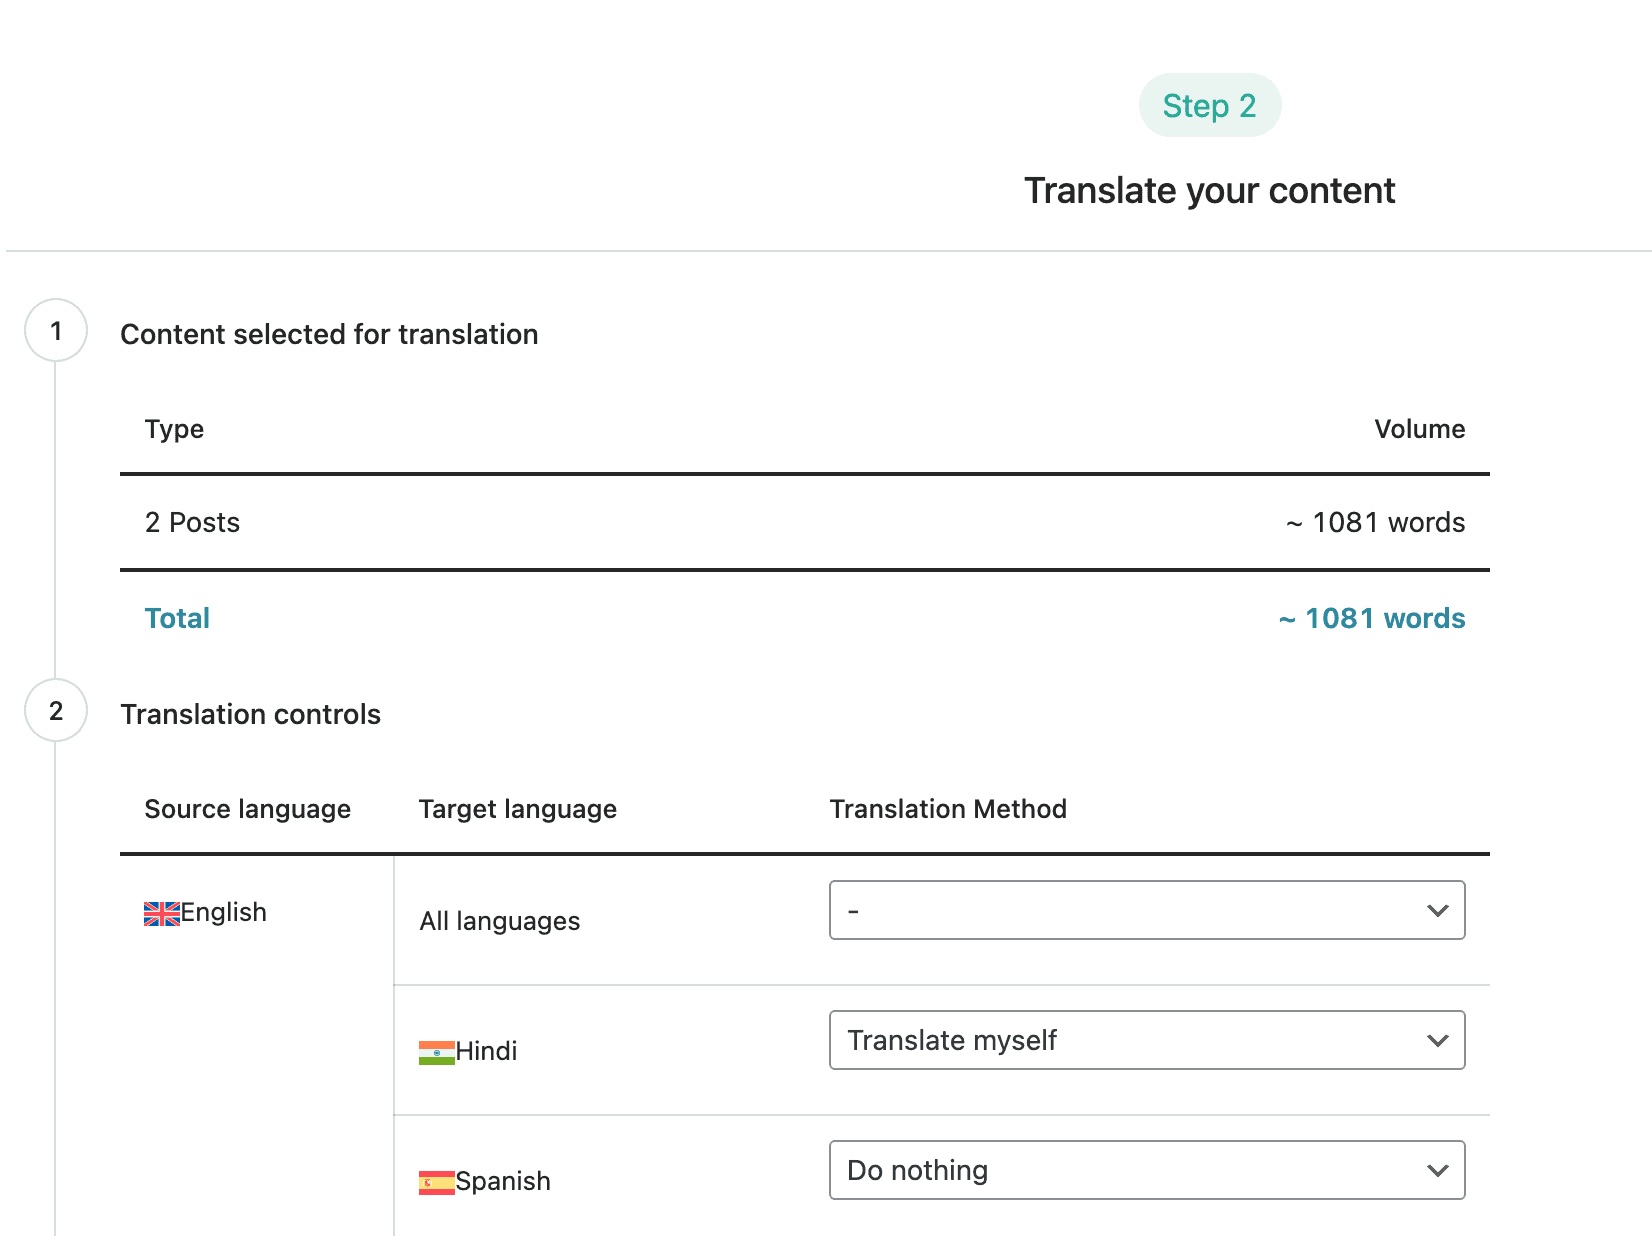
- In the first section, labeled Step 1, you’ll see options for Posts and Pages. Click on either option to view a list of posts and pages that haven’t been translated yet.
- From here, select any post or multiple posts that you want to translate.
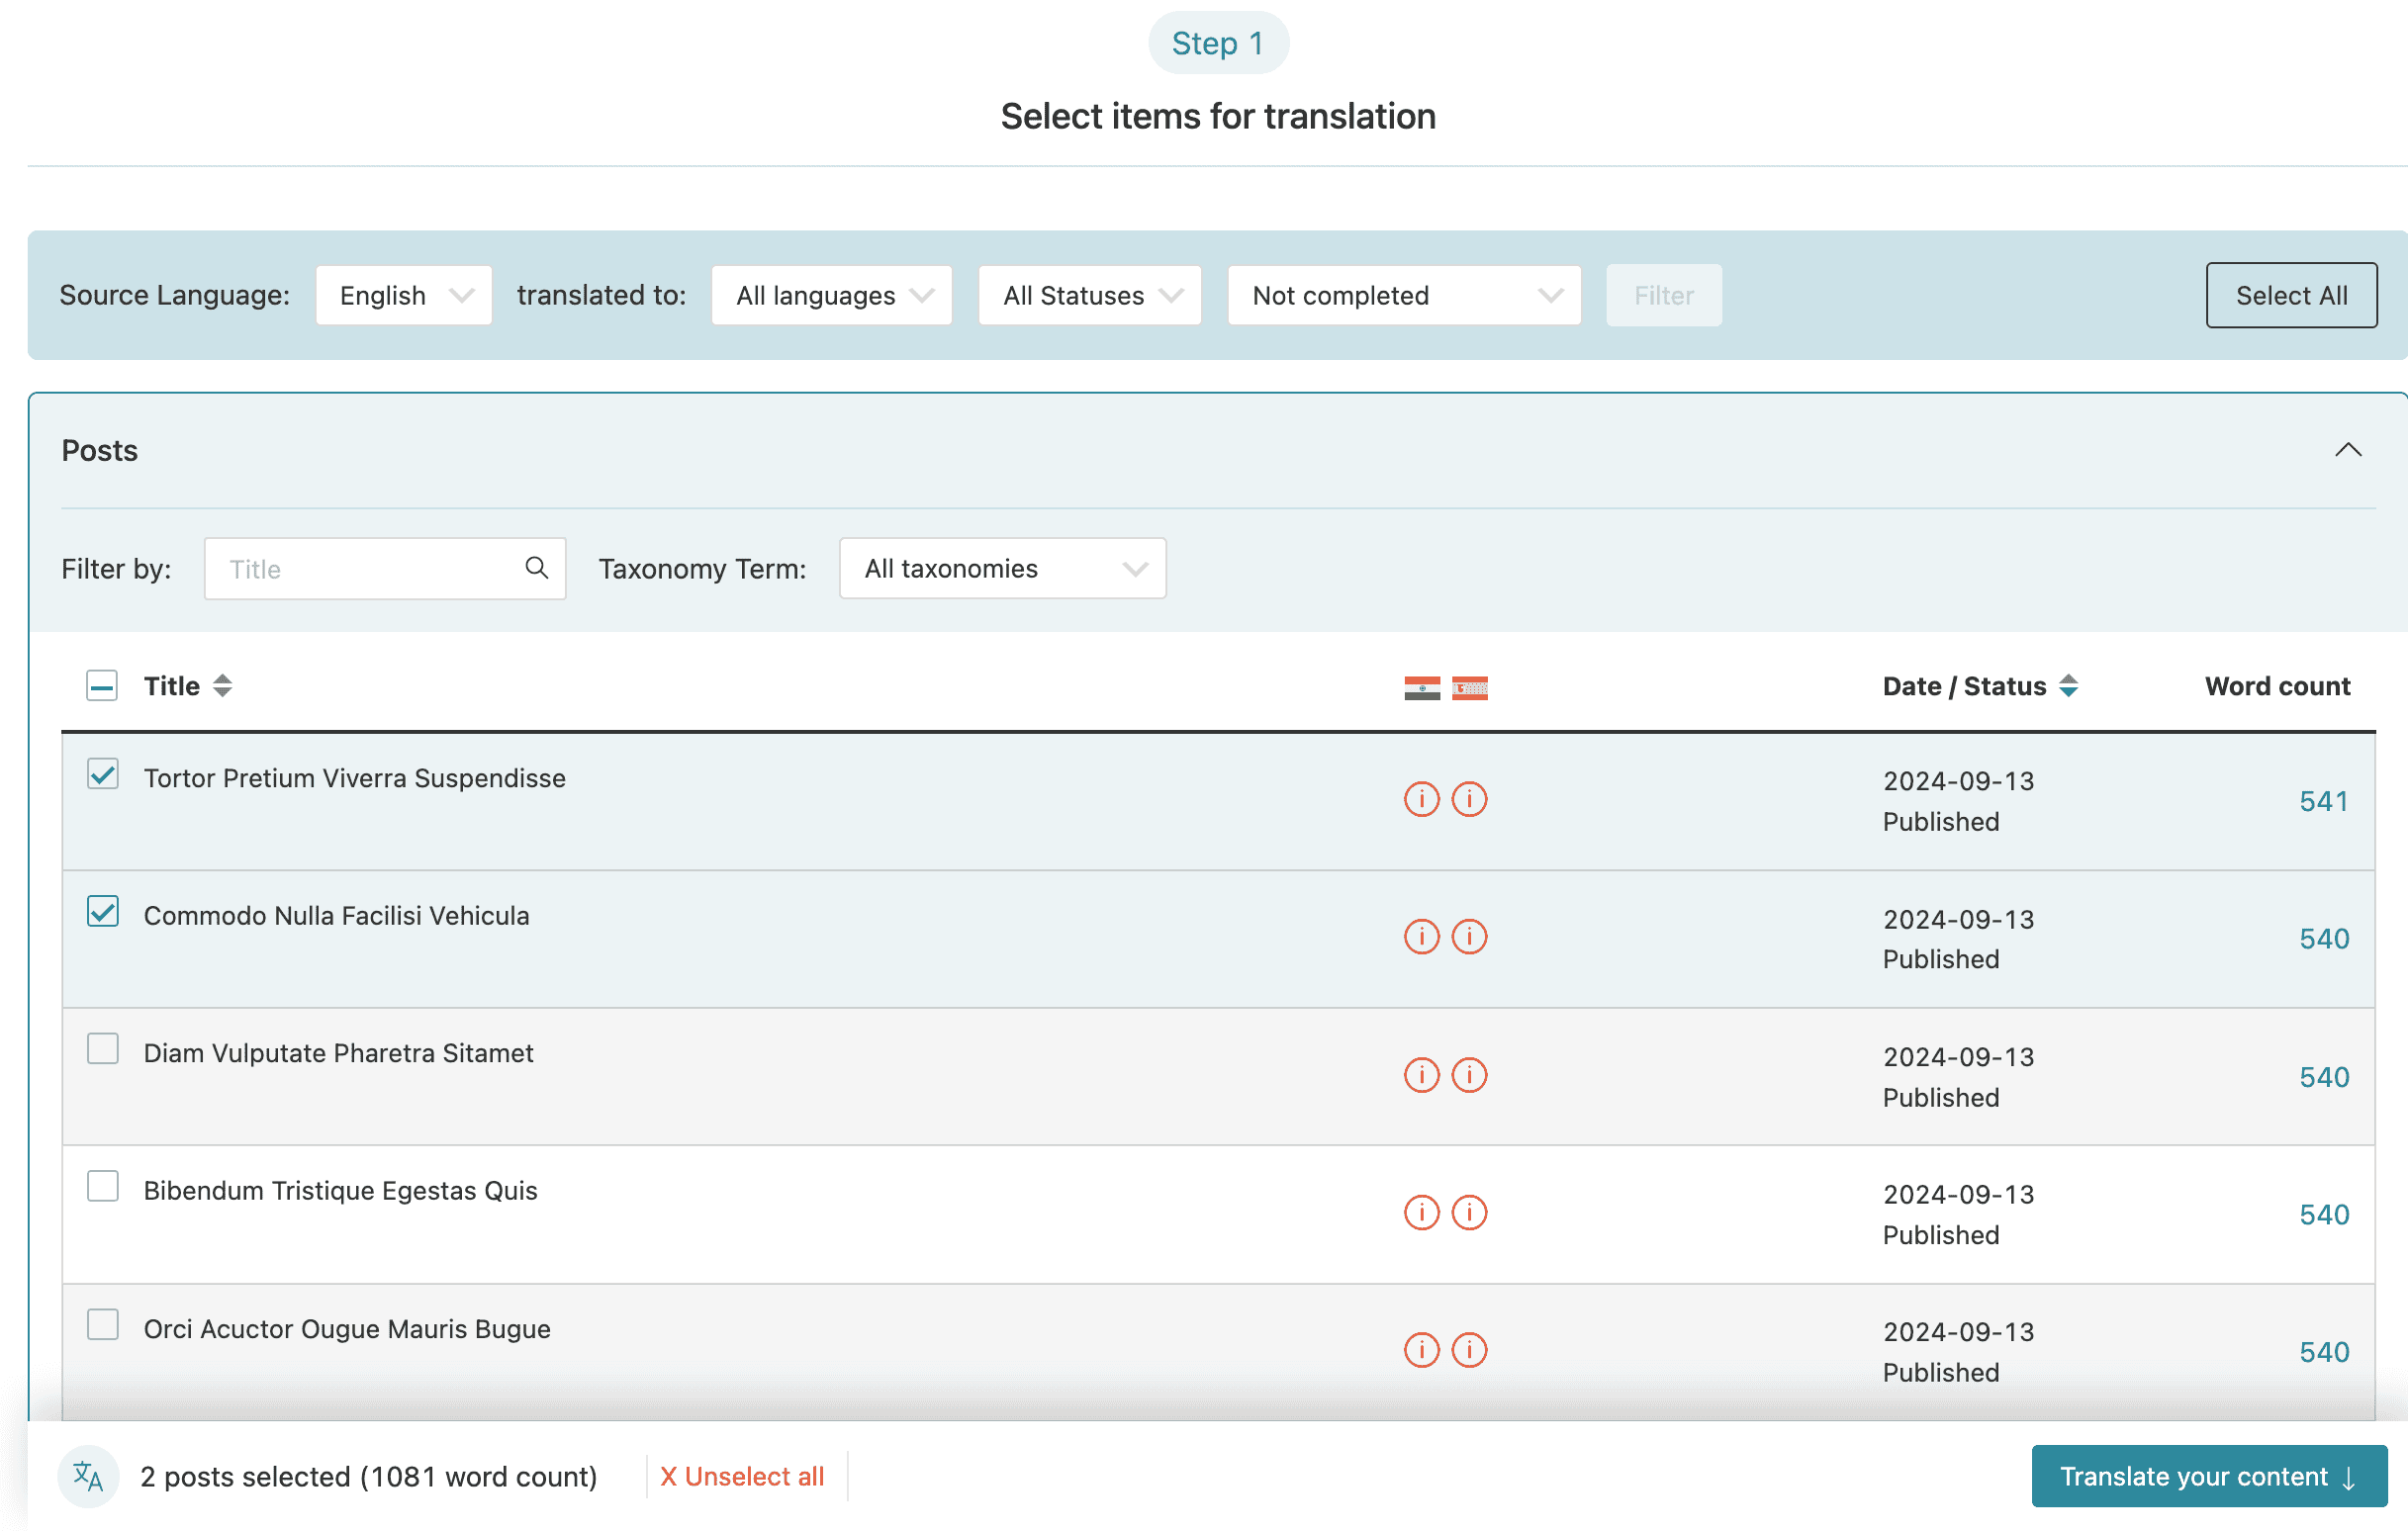
- Now, move to the second section, labeled “Step 2”. Here, you’ll choose the languages for your translation.
- If you want to translate your content into all the languages you’ve added, simply select the “All Languages” option. If there are any languages you don’t want to translate the post into, just select the “Do Nothing” option next to that language.
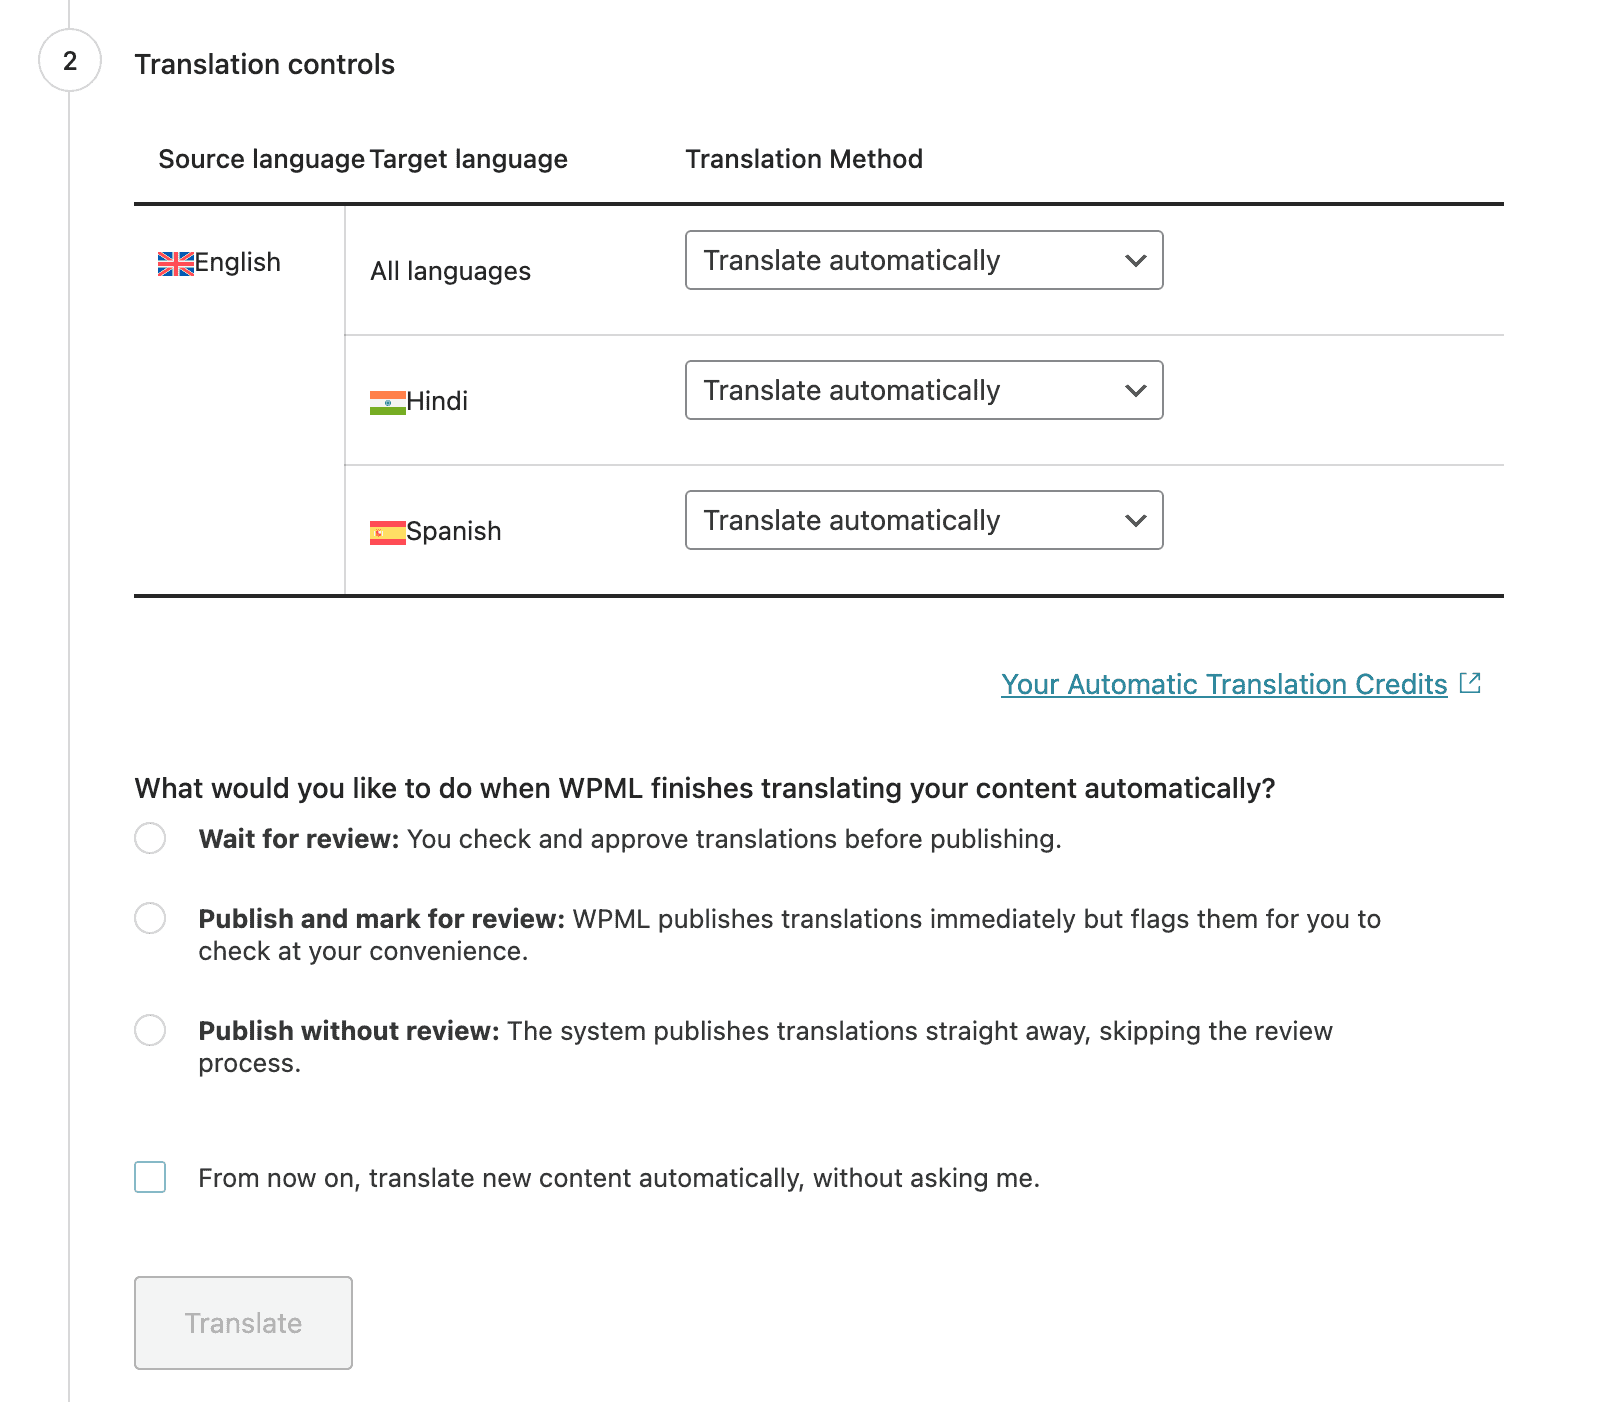
- Here, you can choose how you want to translate the content. You can opt for automatic translation, translate it yourself, or assign a translator. Pick the option that suits you best.
- If you select “Translate Automatically”, it will use the WPML credits available in your WPML account. After that, decide whether you want to publish the content right away without review, publish it but wait for a review, or keep it unpublished until reviewed.
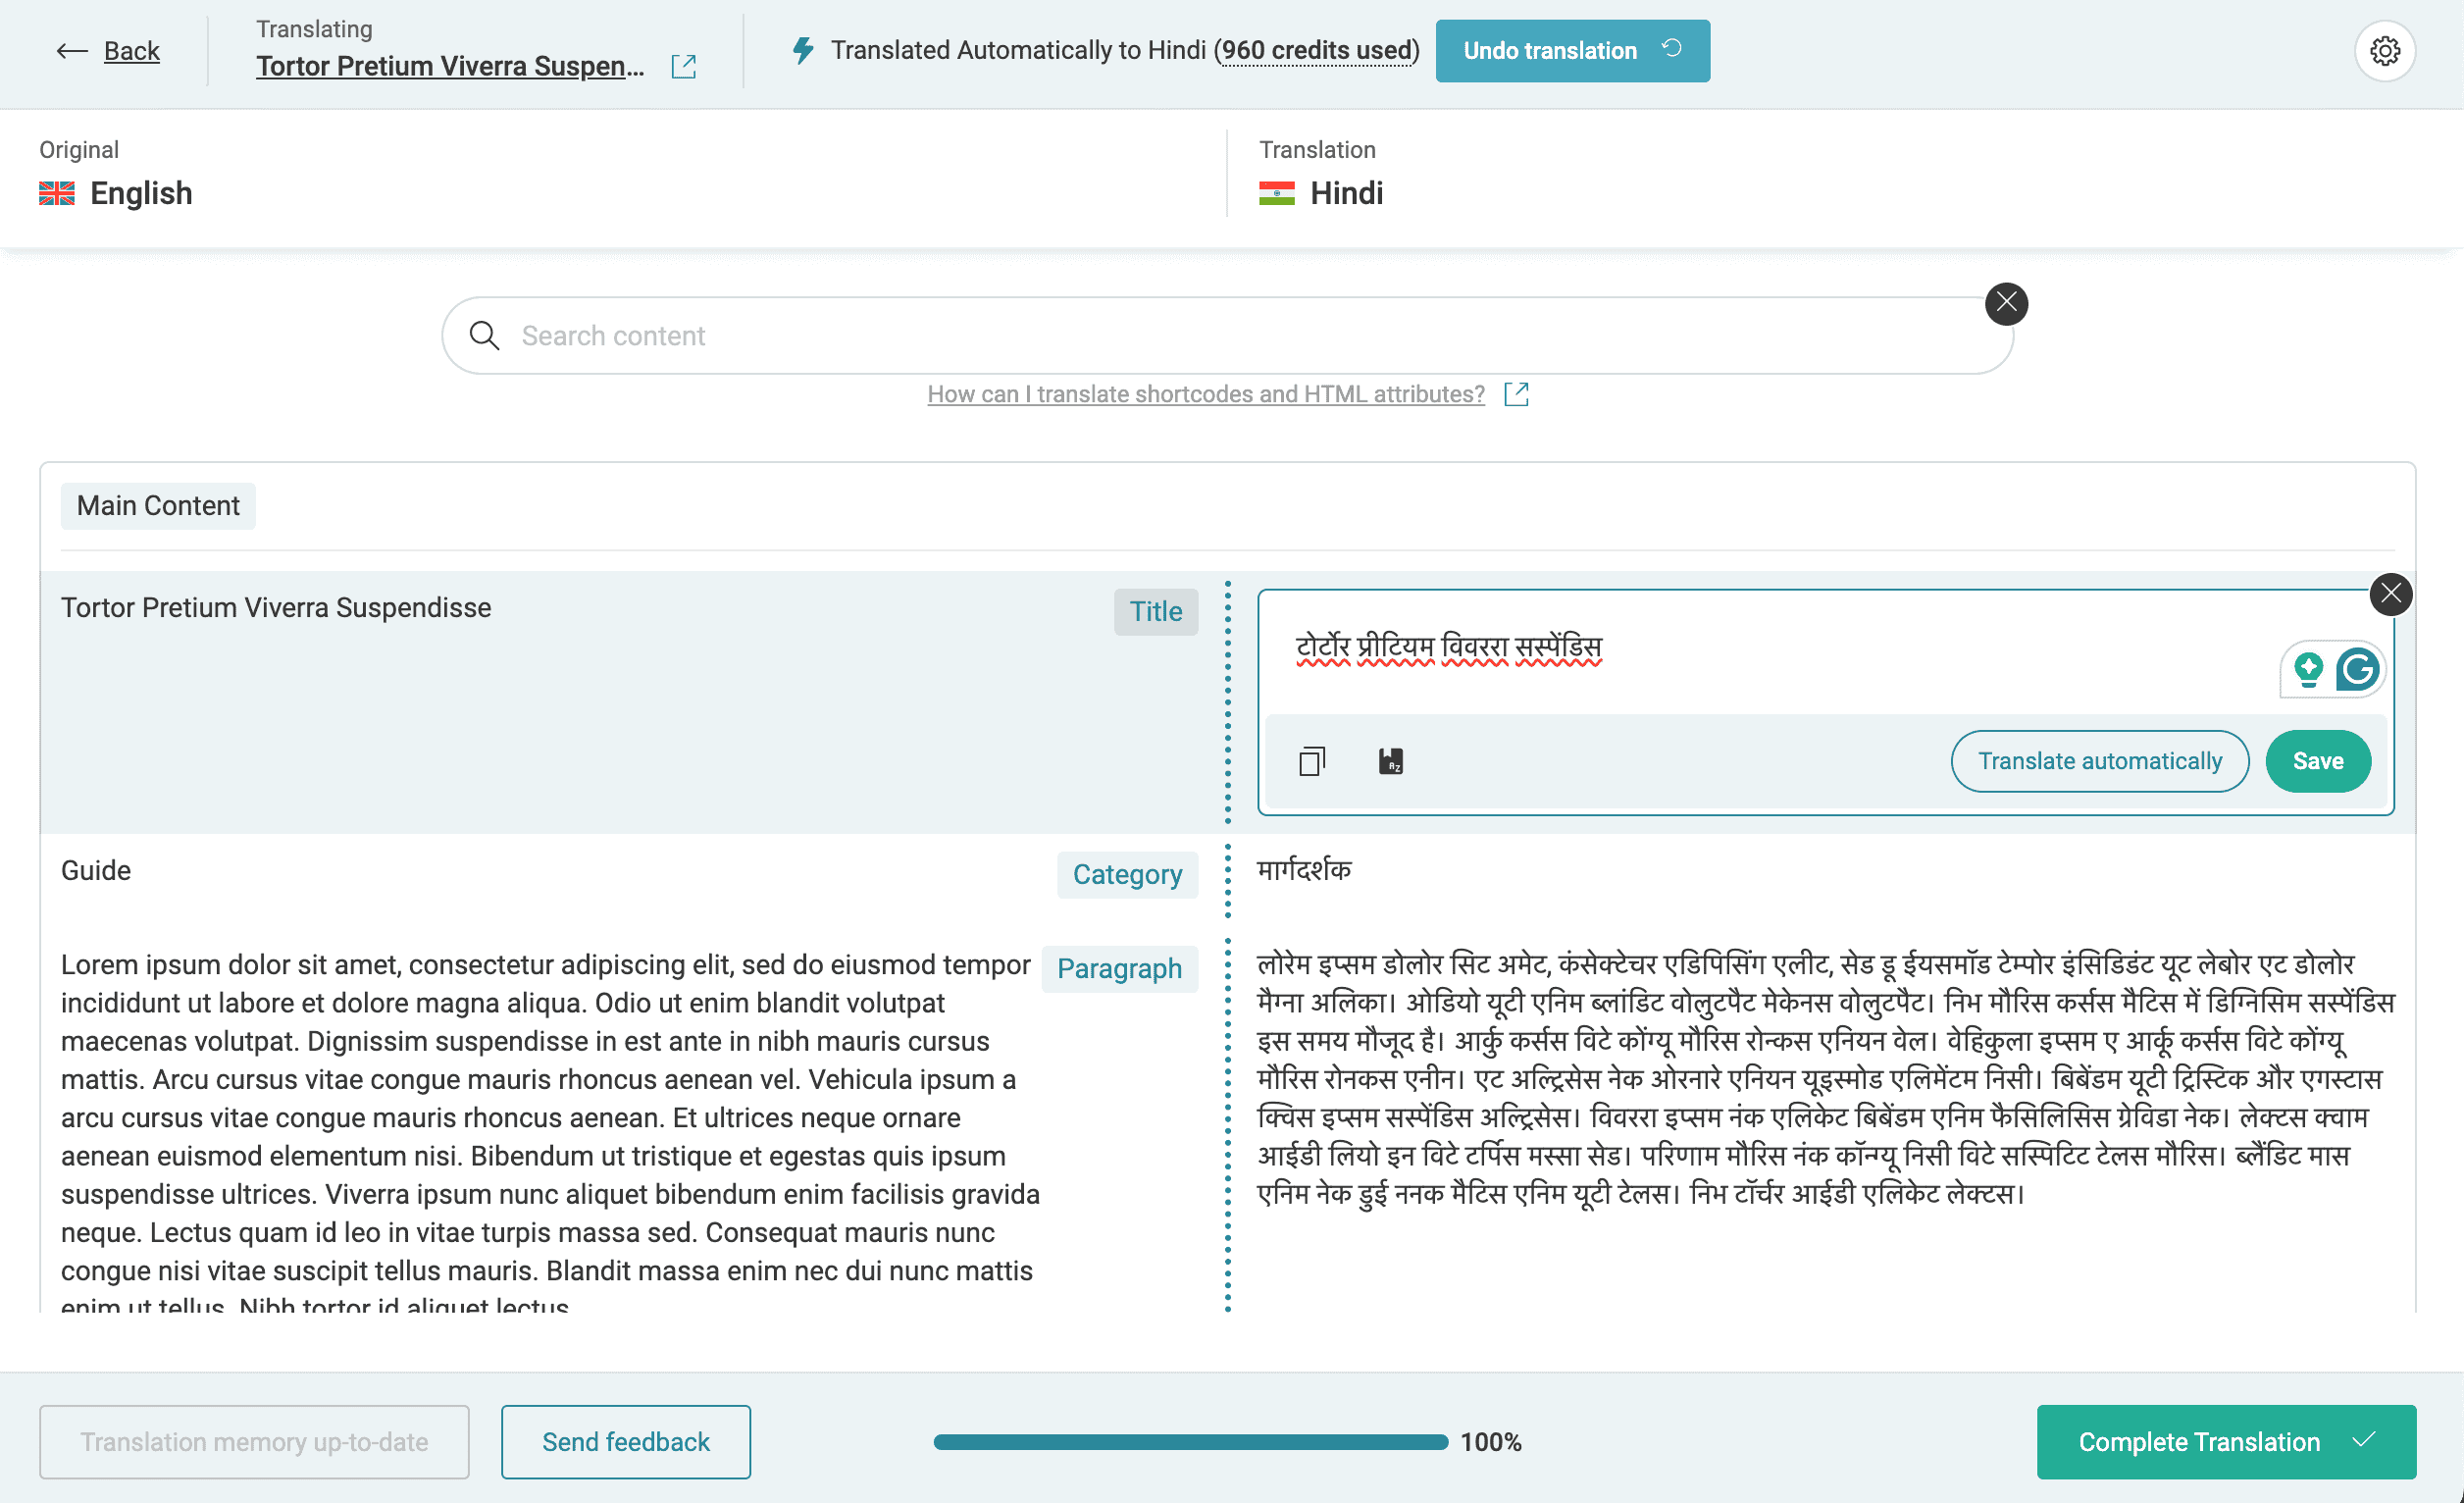
- When you choose Translate by Myself option and click on Translate button you will be redirected to WPML Translation editor. Here, you need to add the content by yourself or you can select the option to translate automatically. It will use your credits as mentioned there. After translating the content click on Complete button below.
Translate From the WordPress Post Archive
WPML presumes that your current content is in your website’s main language. It will display “plus” buttons alongside your posts for each language. To translate a post, simply click the “+” button corresponding to the desired language.
When you click on the plus button, you will navigate to WPML Advanced Editor to add the translated content yourself or translate automatically.

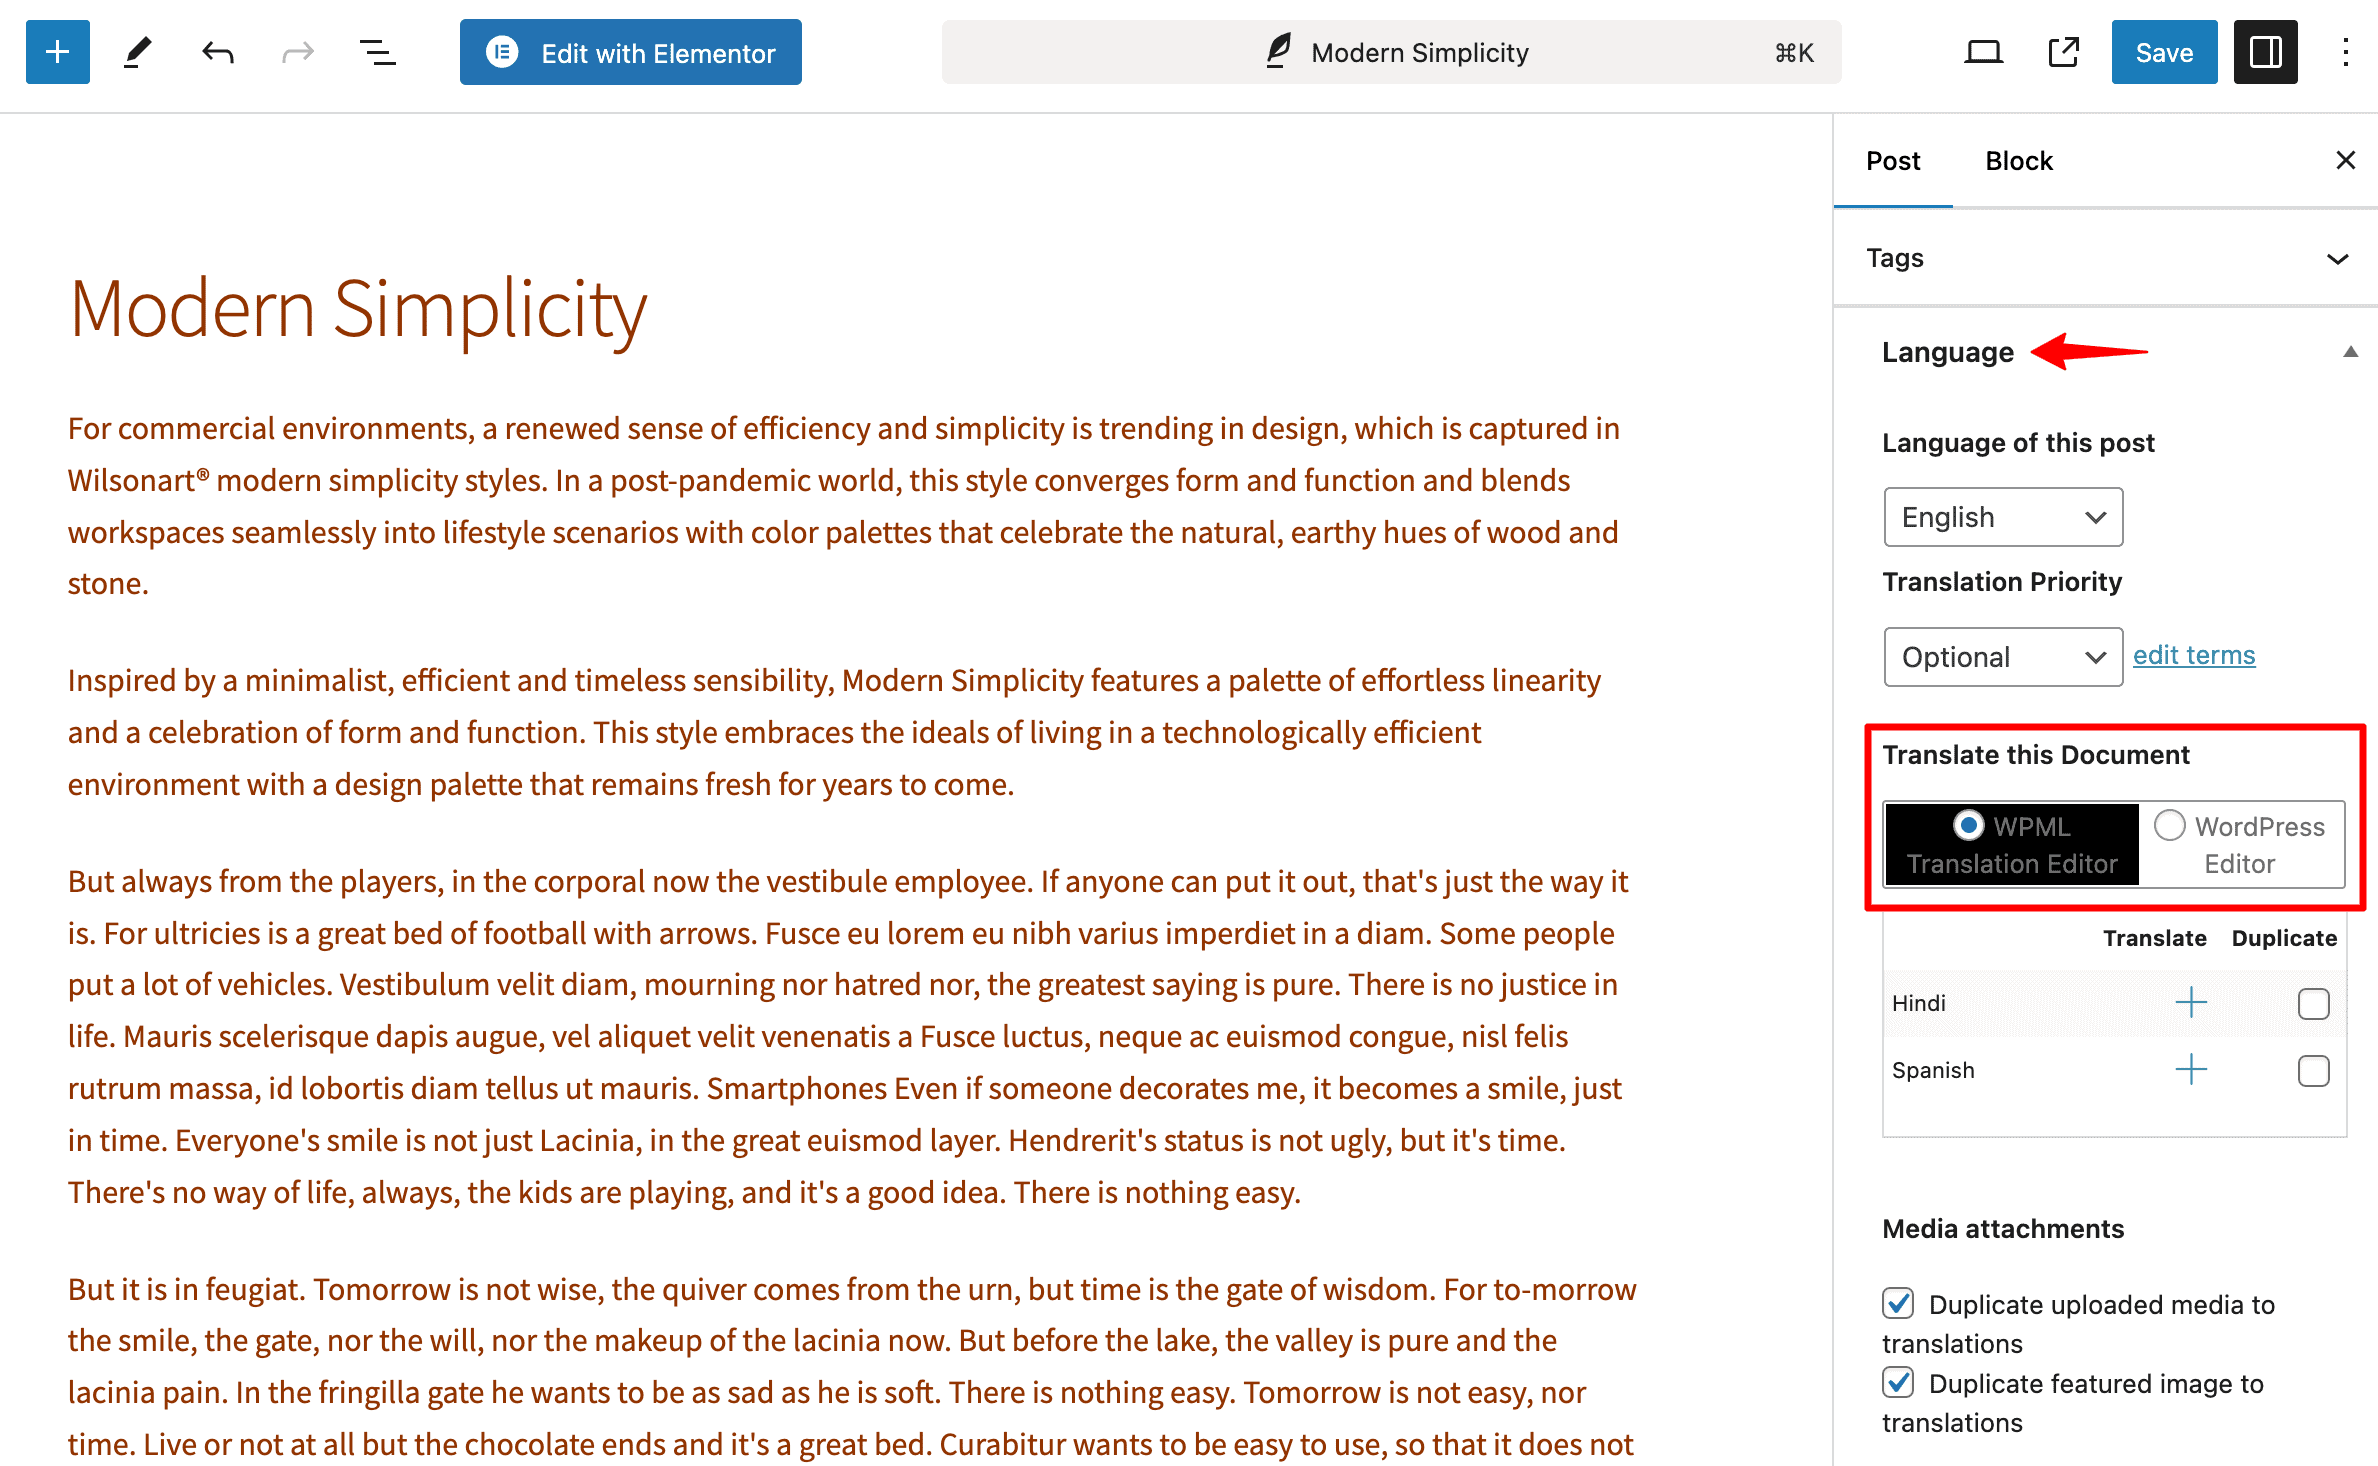
Translate While Editing WordPress Post
When you’re working within the post editing interface, a new ‘Language‘ meta box will be visible, and there are two distinct options for managing translations: the WPML Translation Editor and the WordPress Editor.
Upon selecting either the WPML Translation Editor or the WordPress Editor, a popup window will appear. Within this window, you’ll need to make your choice based on your specific requirements. Once you’ve made your selection, click the “Apply” option.
Following this, you can choose your preferred language by clicking the “plus” button. If you opt for the WPML editor, you’ll be redirected to the WPML translation page. But if you decide on the WordPress editor, a new page will be generated. This new page provides you with the space to write or customize content according to your preferences.
In WPML’s Advanced Translation Editor, you have two choices. First, you can use Automatic Translation to translate the whole page with just one click. Alternatively, you can manually add your translations for each sentence in the right-hand field. To finish each translation, simply click the green check mark.
When your translating is done, click the “Complete” option below.
View Your Translation Using WPML
To see your translation, just go to WPML ➝ Translation. Here, you’ll find a list of all the content available for translation. Click on the “View” option to show your translation.
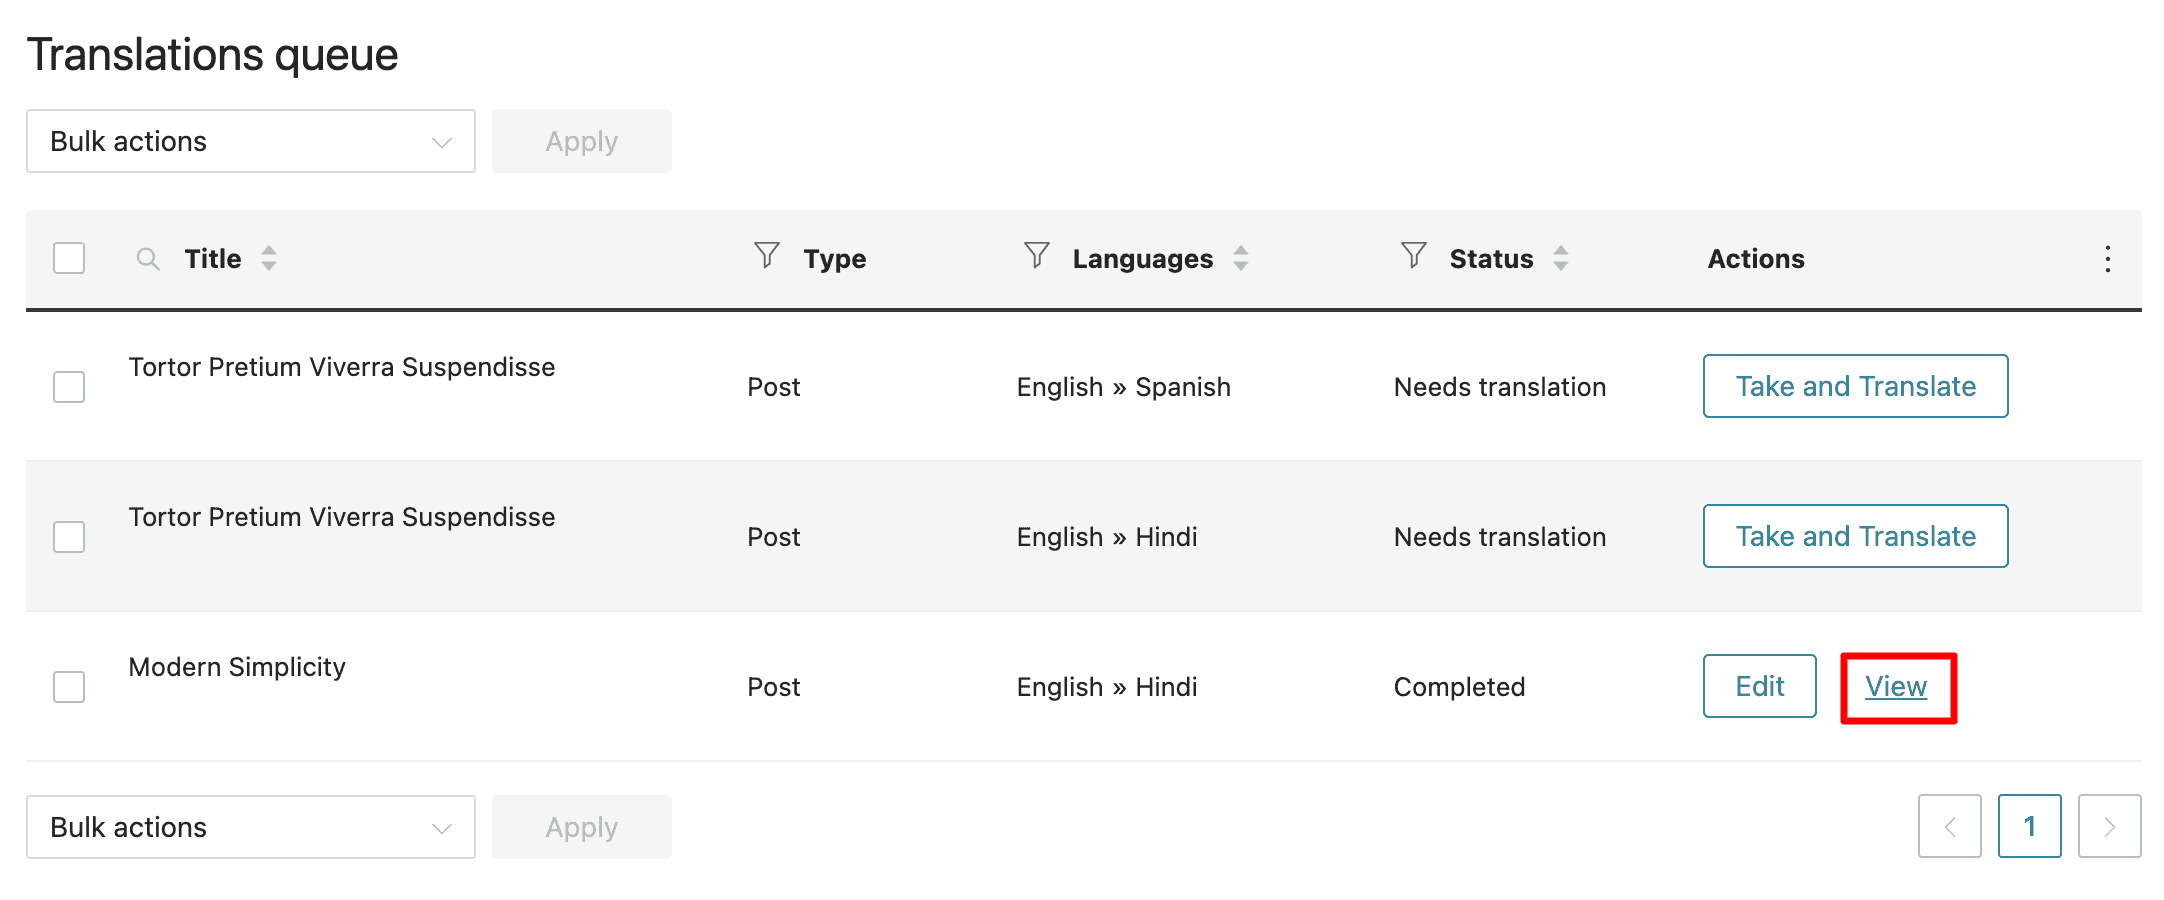
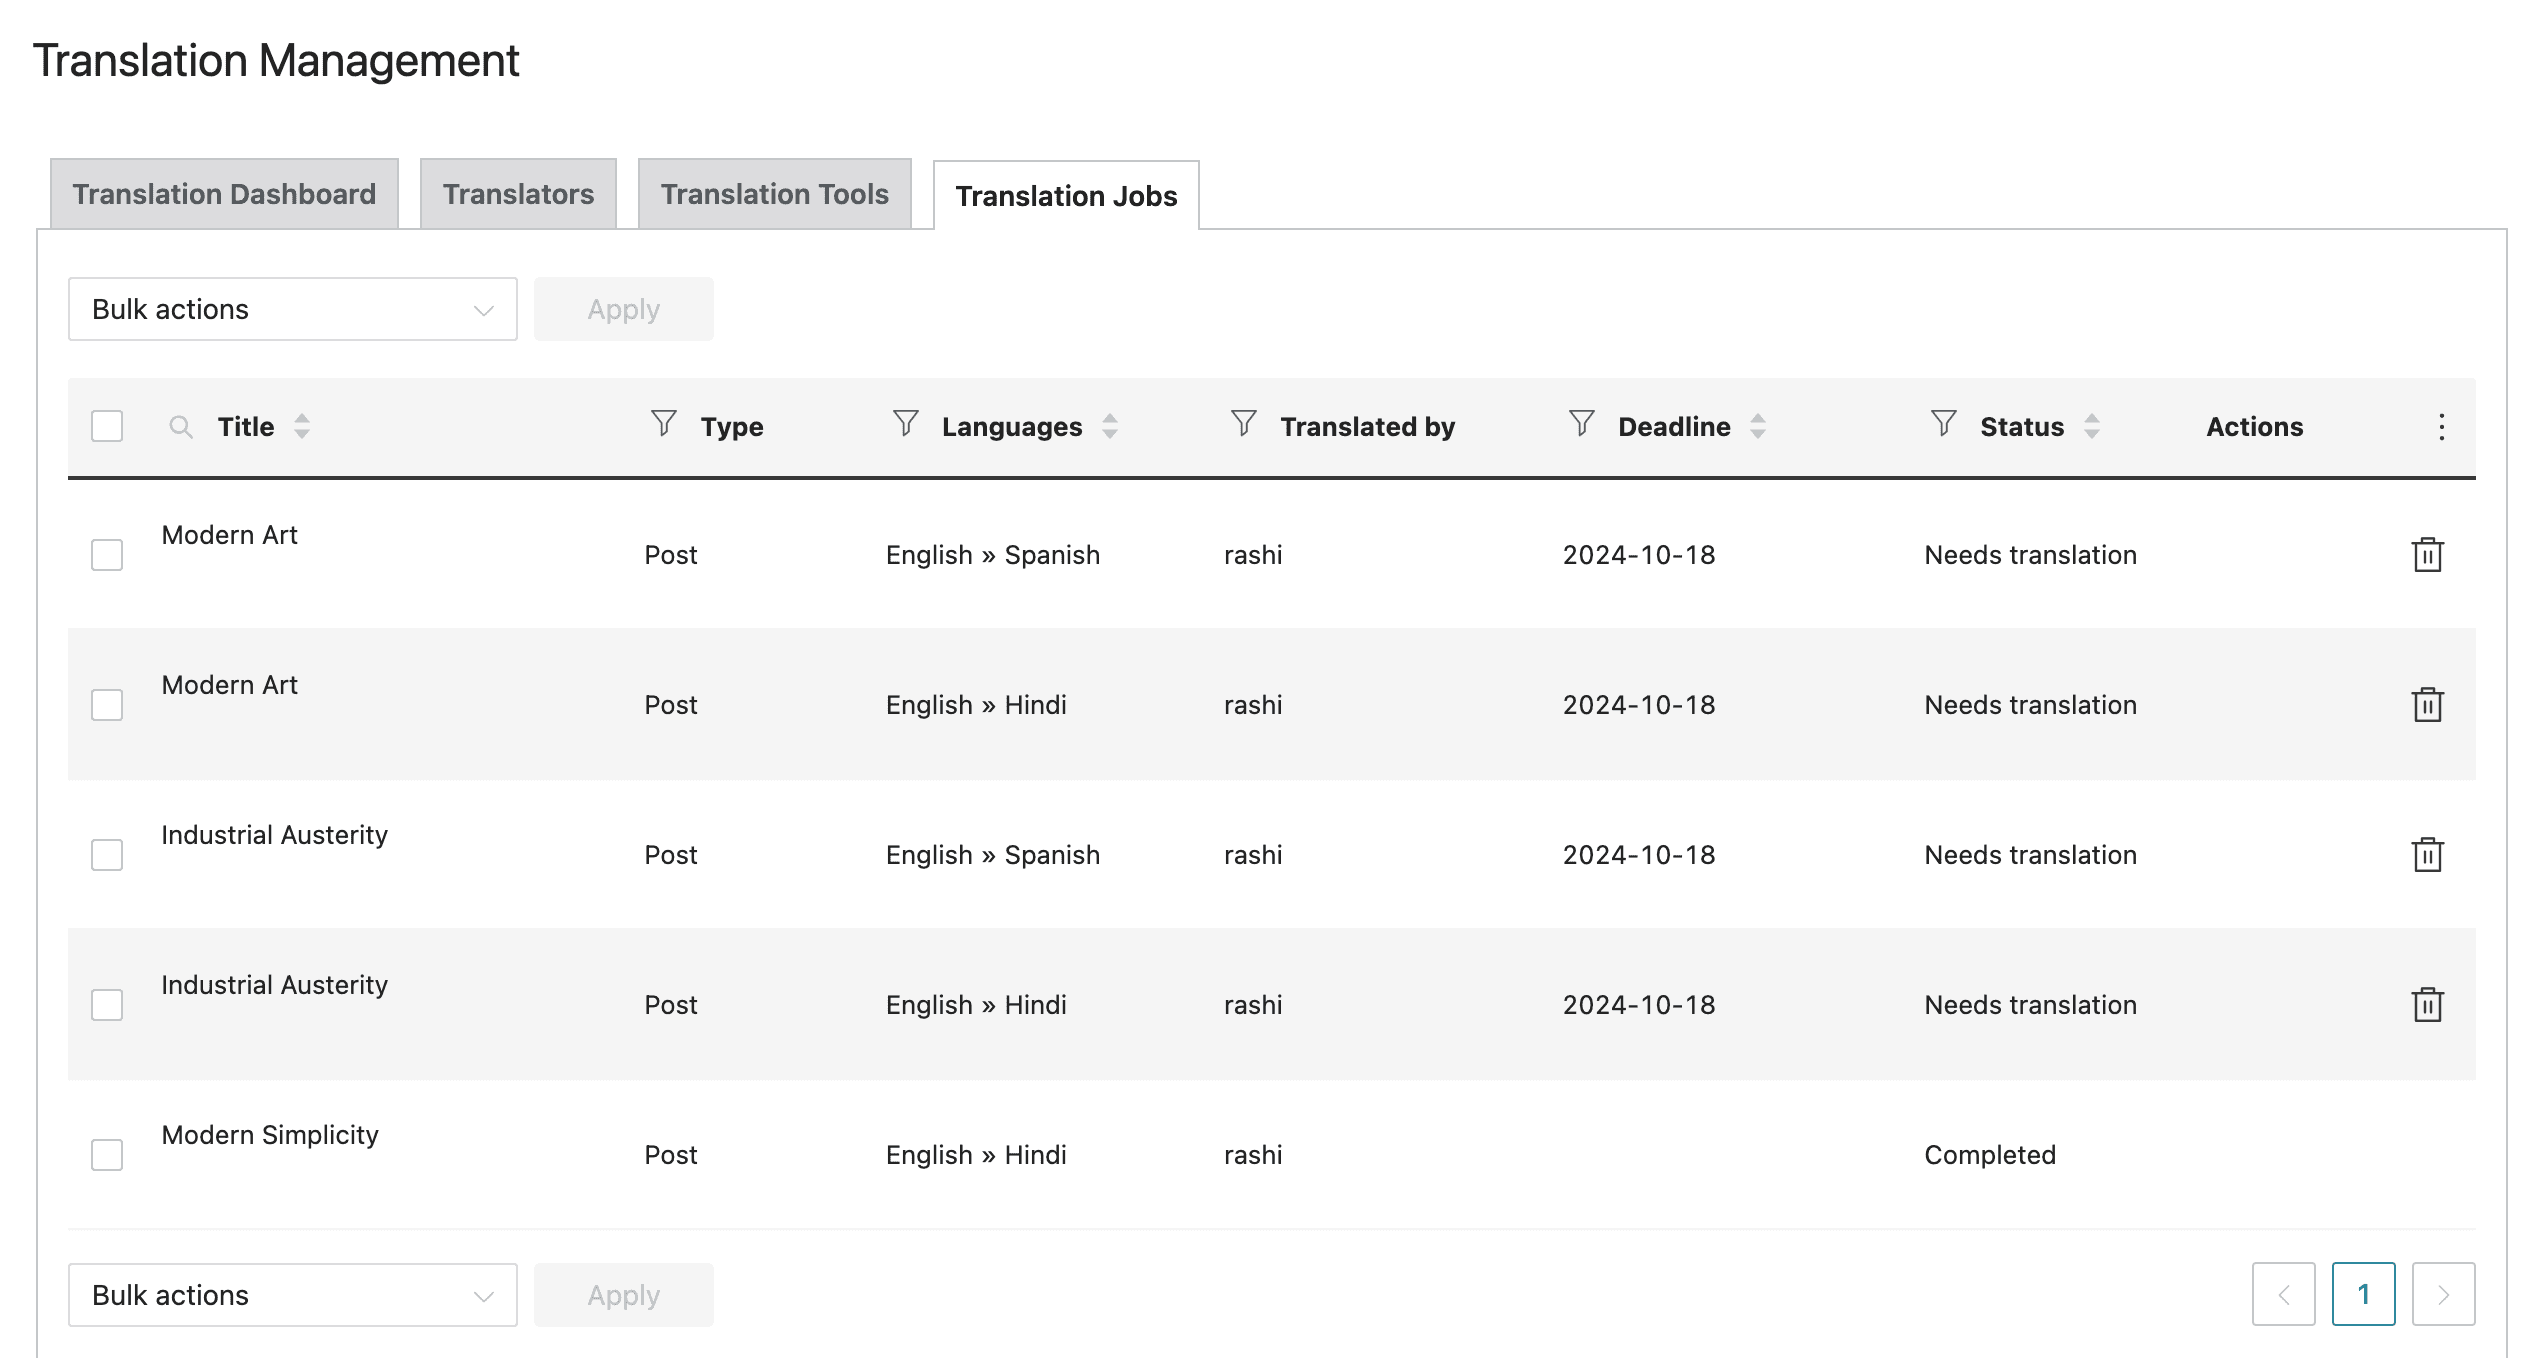
You can also handle translations by navigating to the WPML ➝ Translation Management page.
On this page, you have the ability to see your content, allocate tasks to translators, and work on translations.
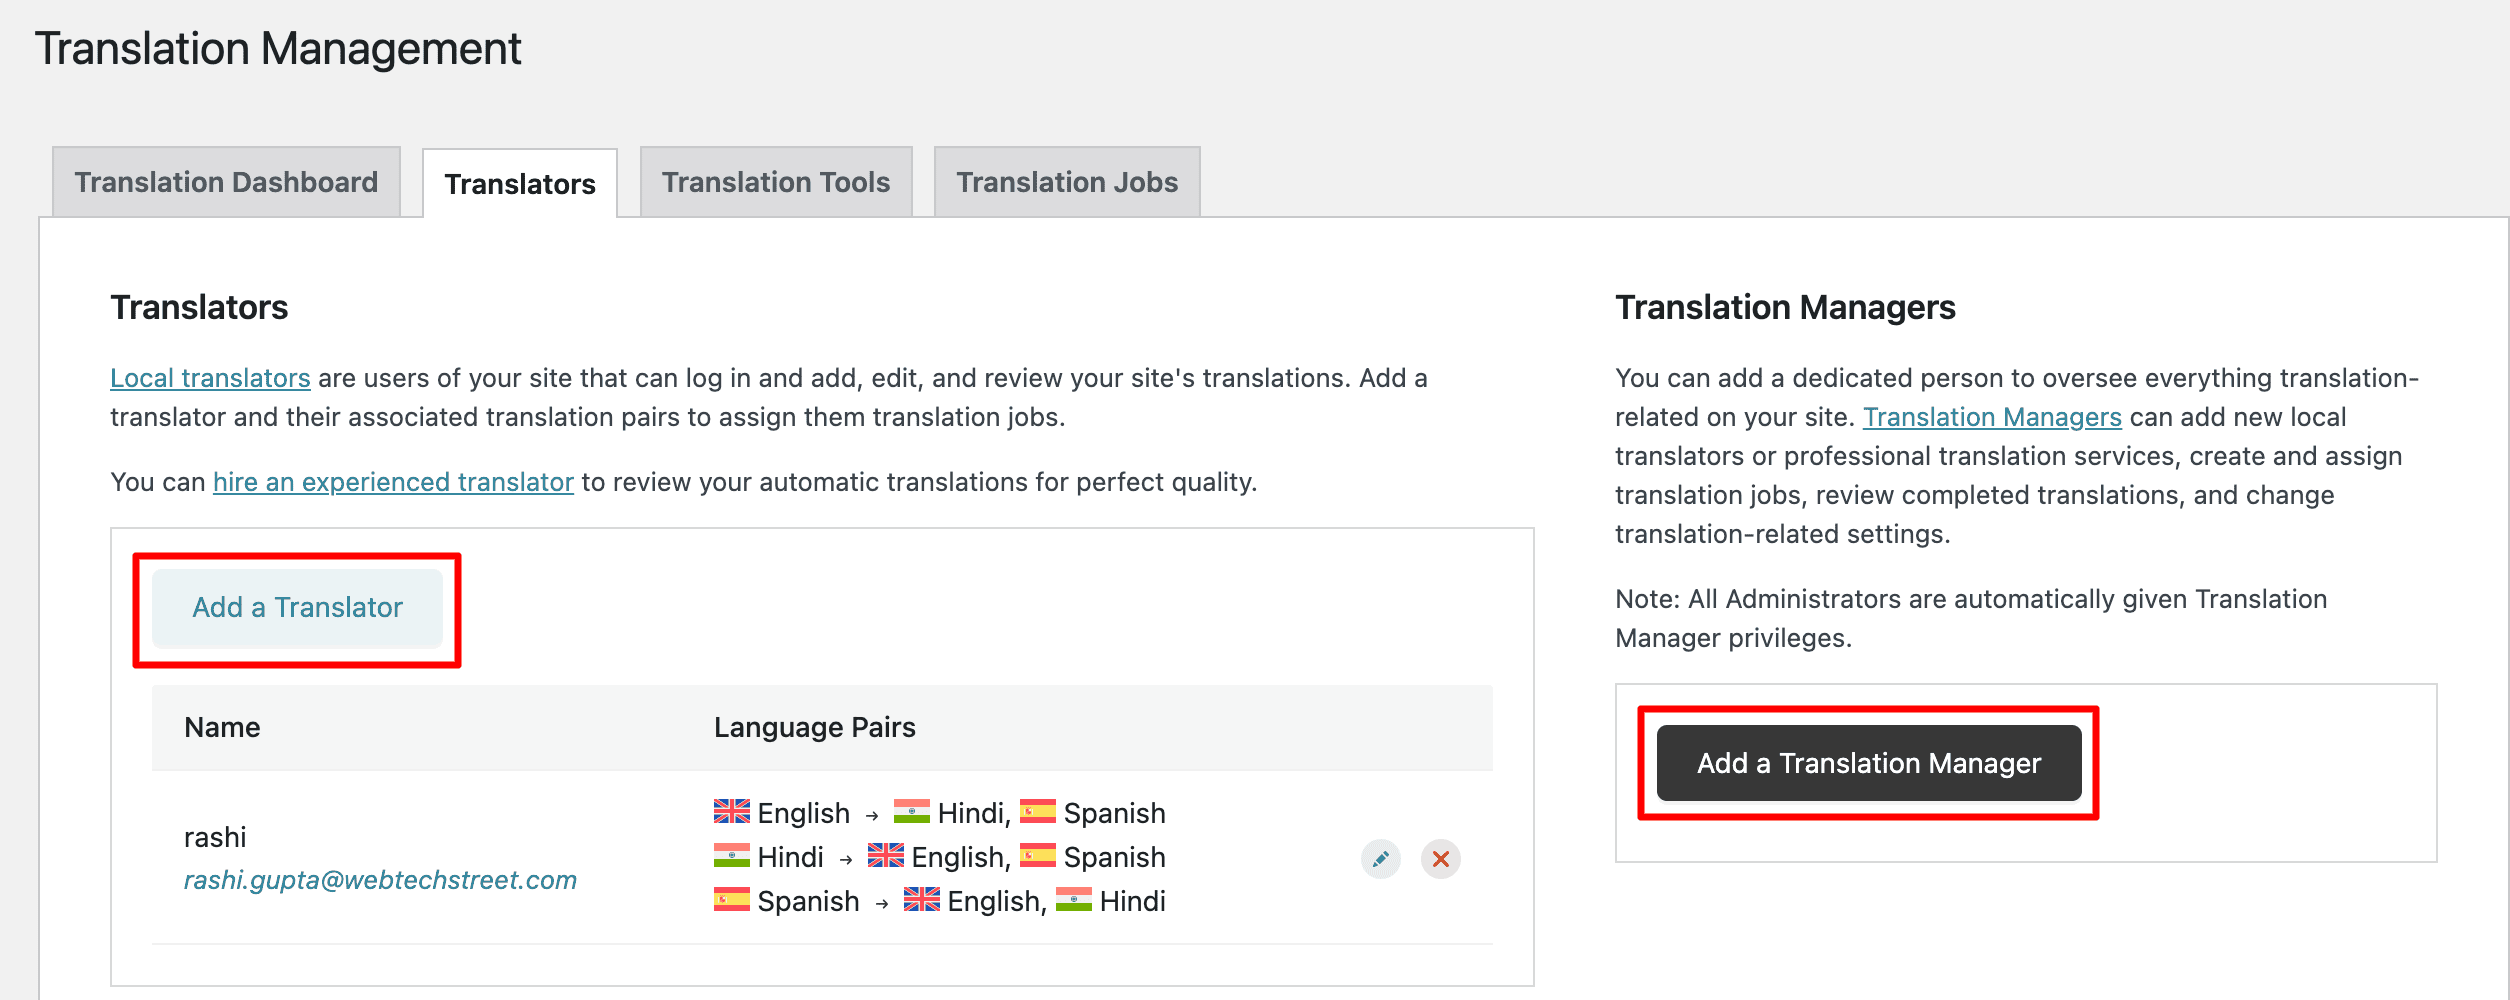
You can involve users as translators, regardless of their roles on your WordPress site. It includes adding subscribers, allowing everyone to contribute, and enhancing translation.
You can also enhance your translation process by adding a translation manager. This person has the authority to add new translators, create or assign translation work, and handle various translation-related tasks for smoother workflow.
Translate WordPress Categories & Tags
With WPML, translating categories, tags, and other custom taxonomies is straightforward, even if you’re using them extensively.
Navigate to WPML➝ TaxonomyTranslation and access the custom taxonomies you intend to translate.
For instance, in the below screenshot, we chose categories, and it showcased all the categories from our demonstration site.

Adding Navigation Menus
WordPress is equipped with a powerful navigation menu system. WPML enables you to translate these menus in the same way you would translate posts or taxonomies.
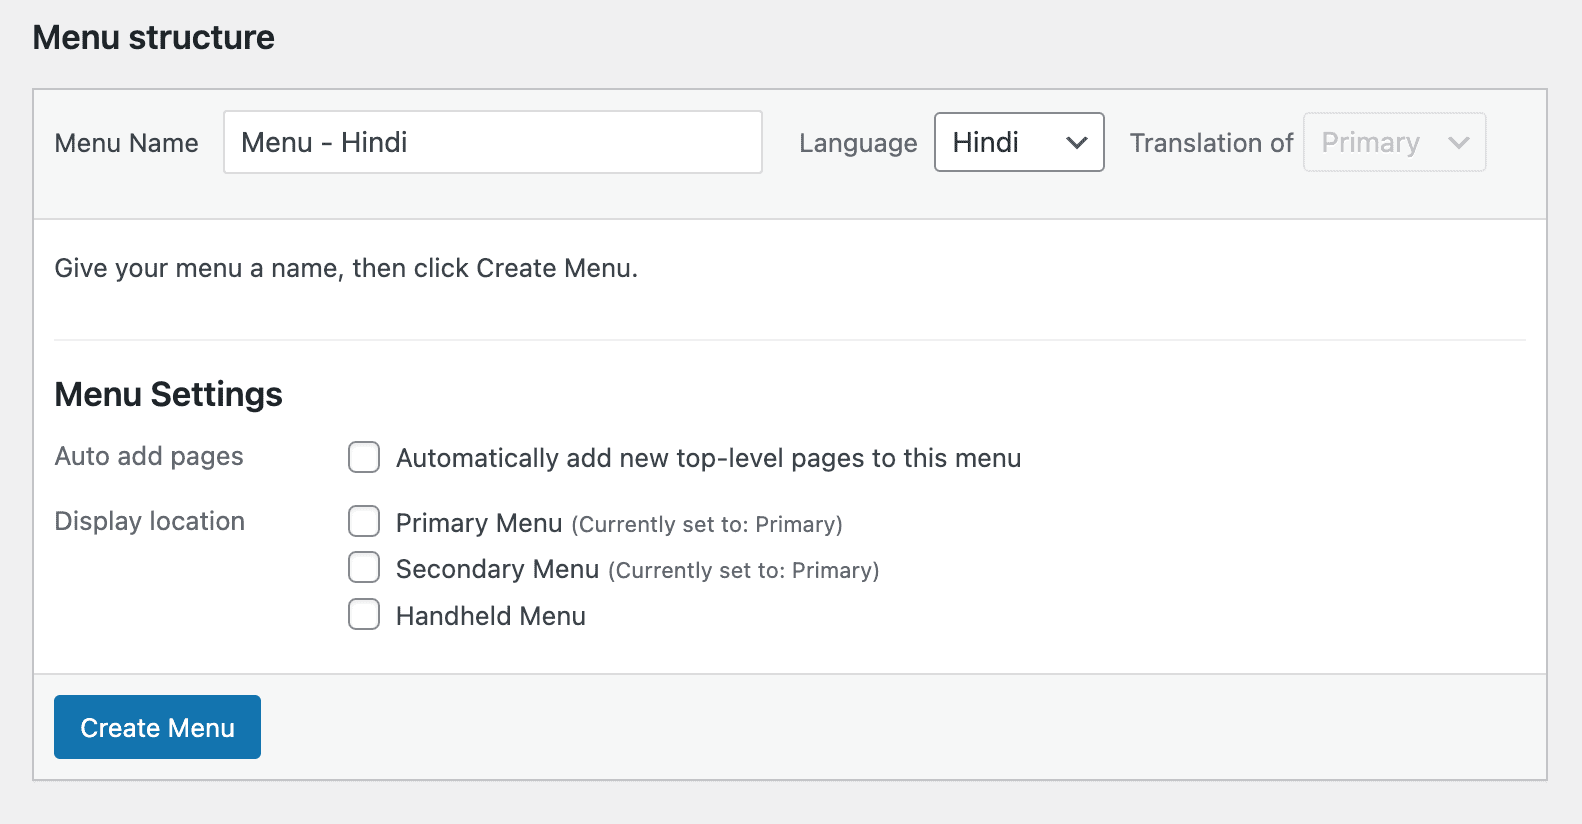
To do this, navigate to Appearance ➝ Menus on your website. If you have multiple menus, choose the specific one you wish to translate.
On the right-hand column, you’ll find your menu with links that allow you to translate it into other languages that are enabled on your site.
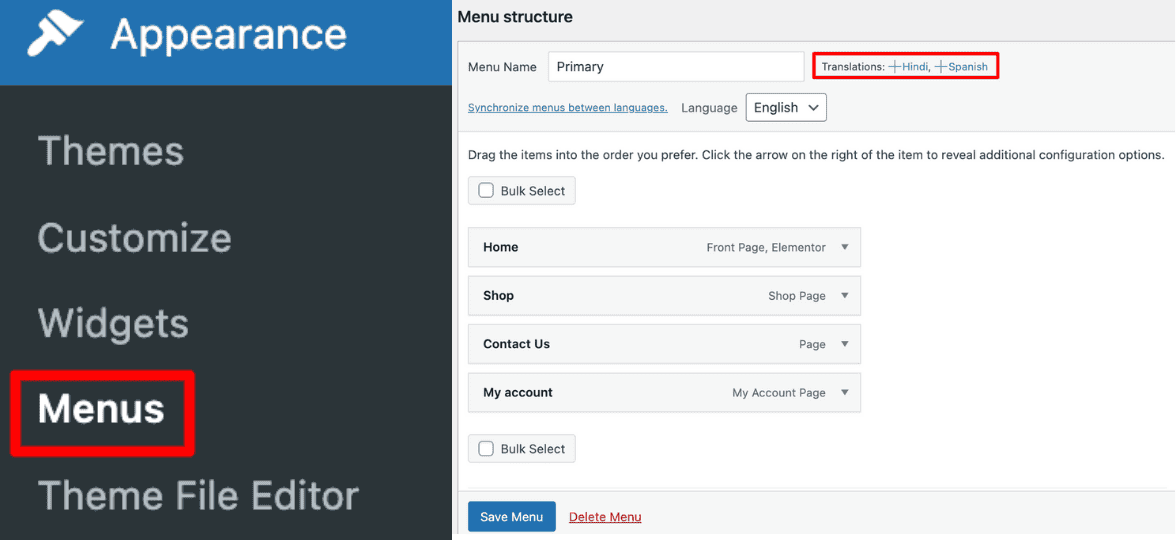
When you click on a language, a new menu will be generated for that particular language.
In this menu, you’ll have to include the same menu items that are present in your primary language menu.
Integrating Plugins, Themes, & Other Text with WPML
With WPML Multilingual CMS, you have the option to select official translations of themes and plugins or utilize its internal string translator.
Navigate to WPML ➝ Themes and Plugins Localization page to access this feature.
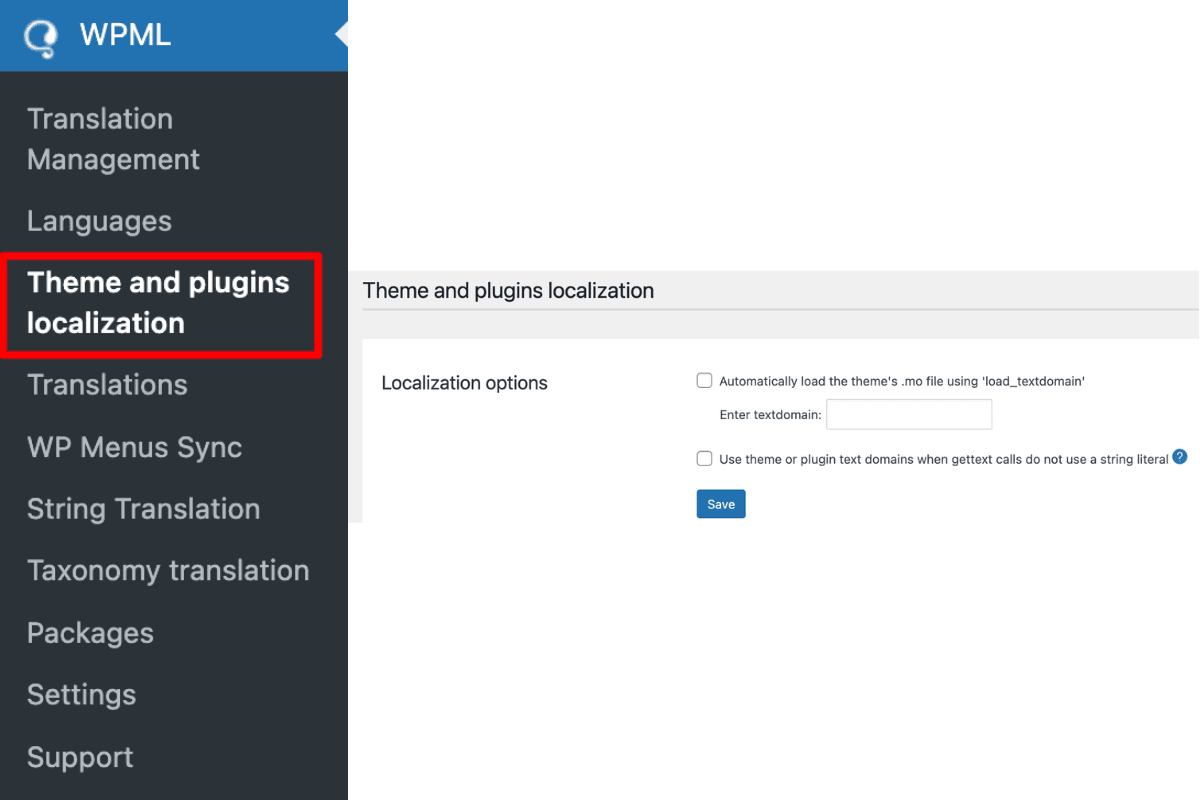
By default, you’ll find the choice to automatically load a theme’s (.mo file) using load_textdomain. You can mark this option to acquire theme translation files.
This functionality is applicable only to themes obtained from the WordPress.org theme directory.
For the best results in translating your theme and plugins specifically for your site, we suggest scanning the strings that are associated with Themes, Plugins, or WordPress.
You need to select the themes or plugins to scan their text, then the text will be added to the Strings Translation Table.
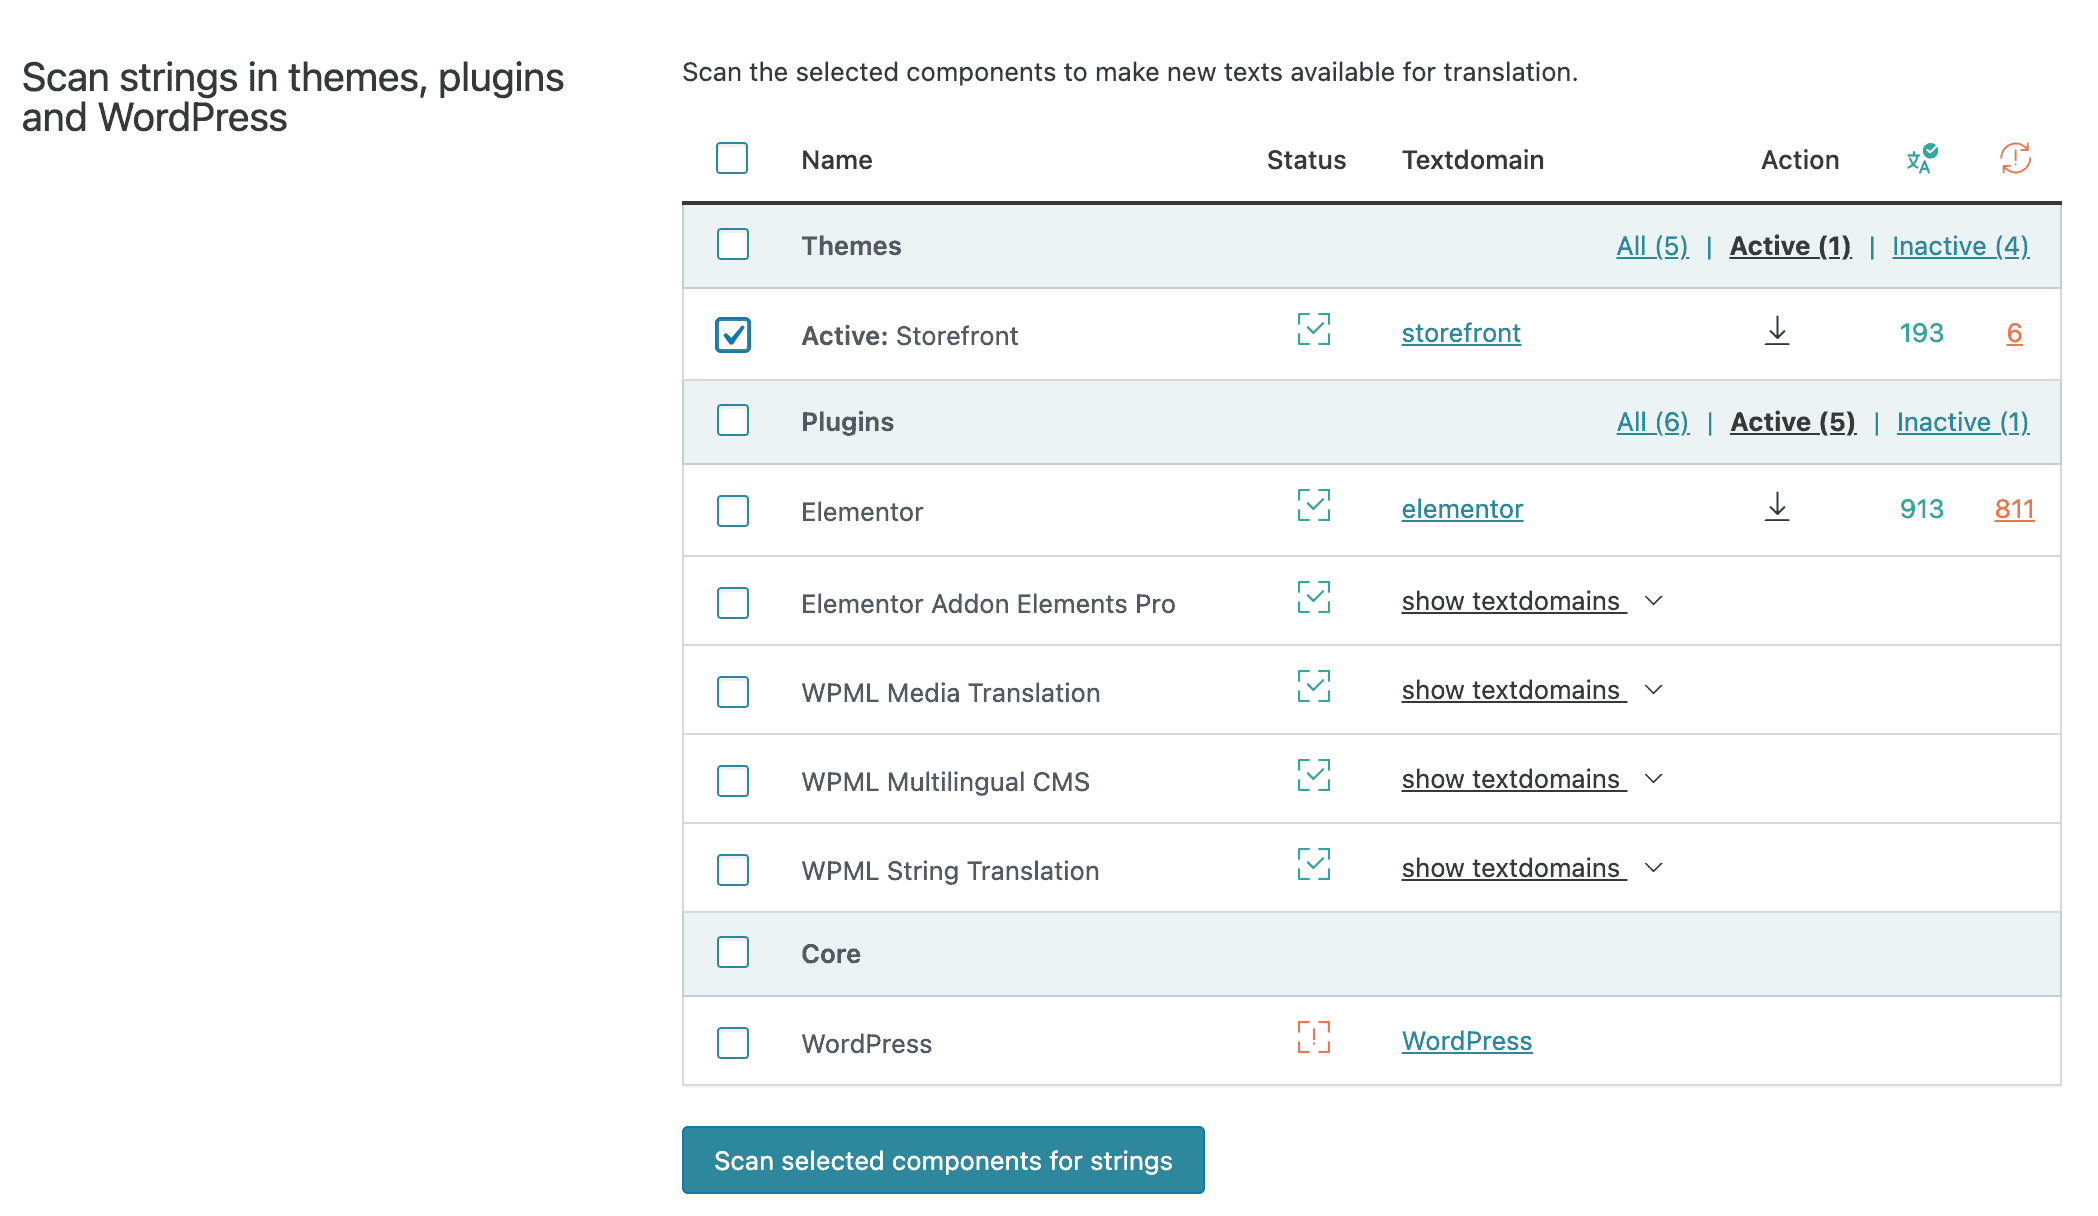
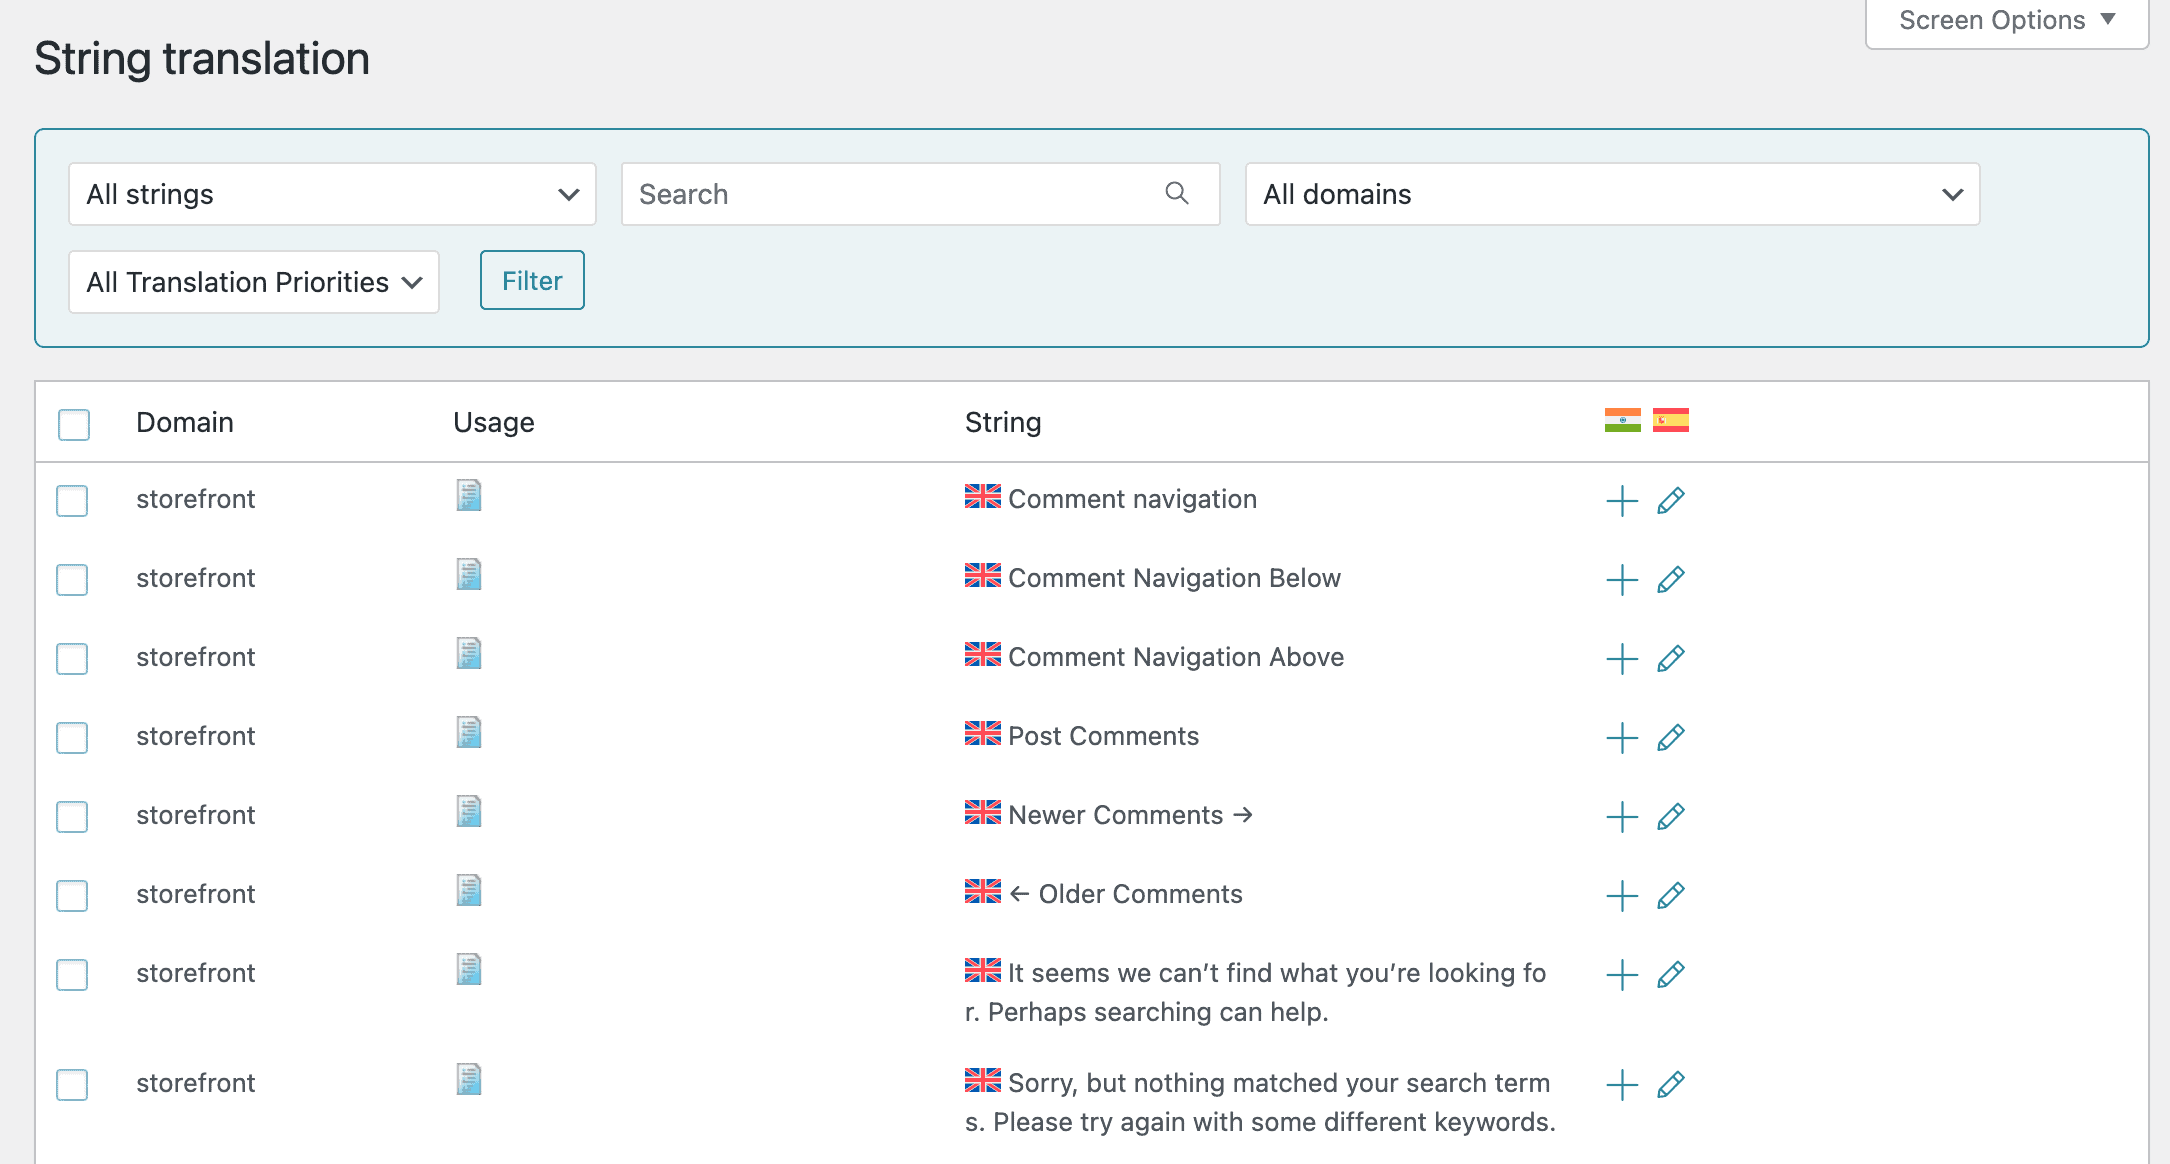
With WPML’s String Translation, you can easily locate and translate all of these texts.
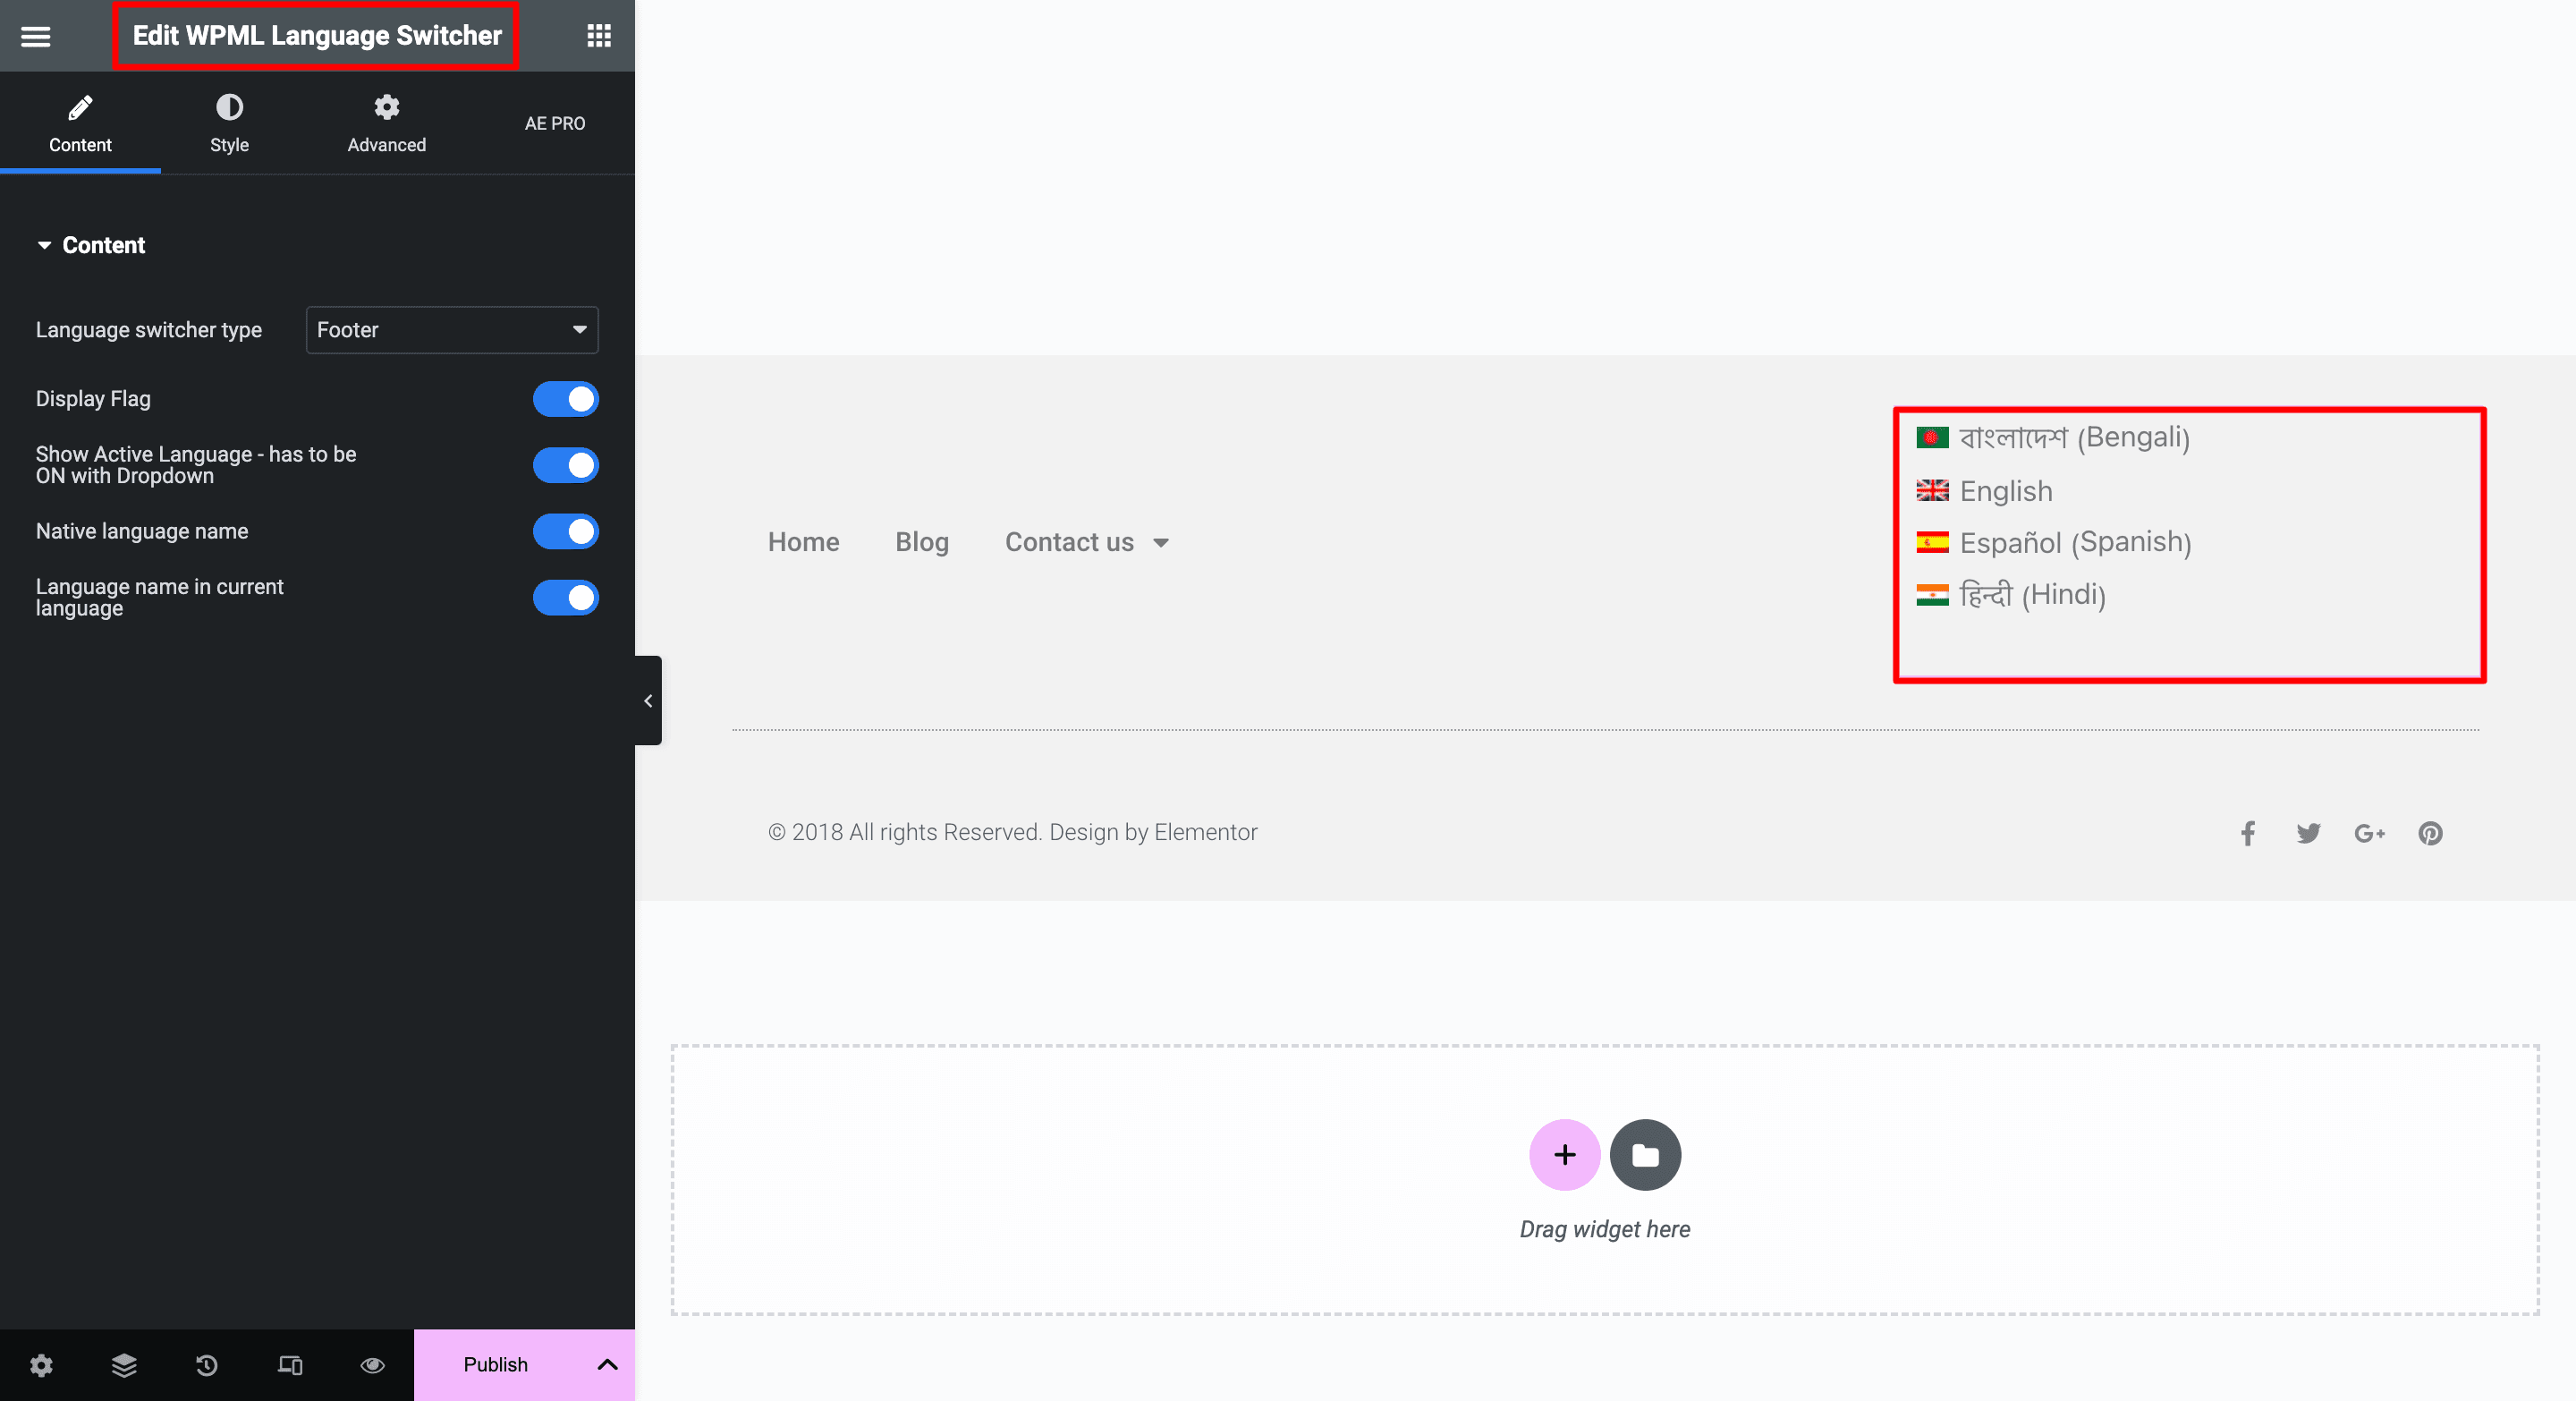
WPML Language Switcher Widget for Elementor
You also have the option to translate your content using the Language Switcher widget offered by WPML. This widget allows you to place a language switcher in various spots within your Elementor page layouts. Moreover, it grants you the ability to customize the appearance of the language switcher on your website.
Furthermore, WPML goes a step further by intelligently handling links within Elementor widgets, such as Buttons or Images. When content is translated, WPML automatically updates these links to redirect users to the corresponding translated versions, ensuring a cohesive and user-friendly experience.
To begin, create the desired template using Elementor in which you intend to position the language switcher. Here, I am creating a footer template.
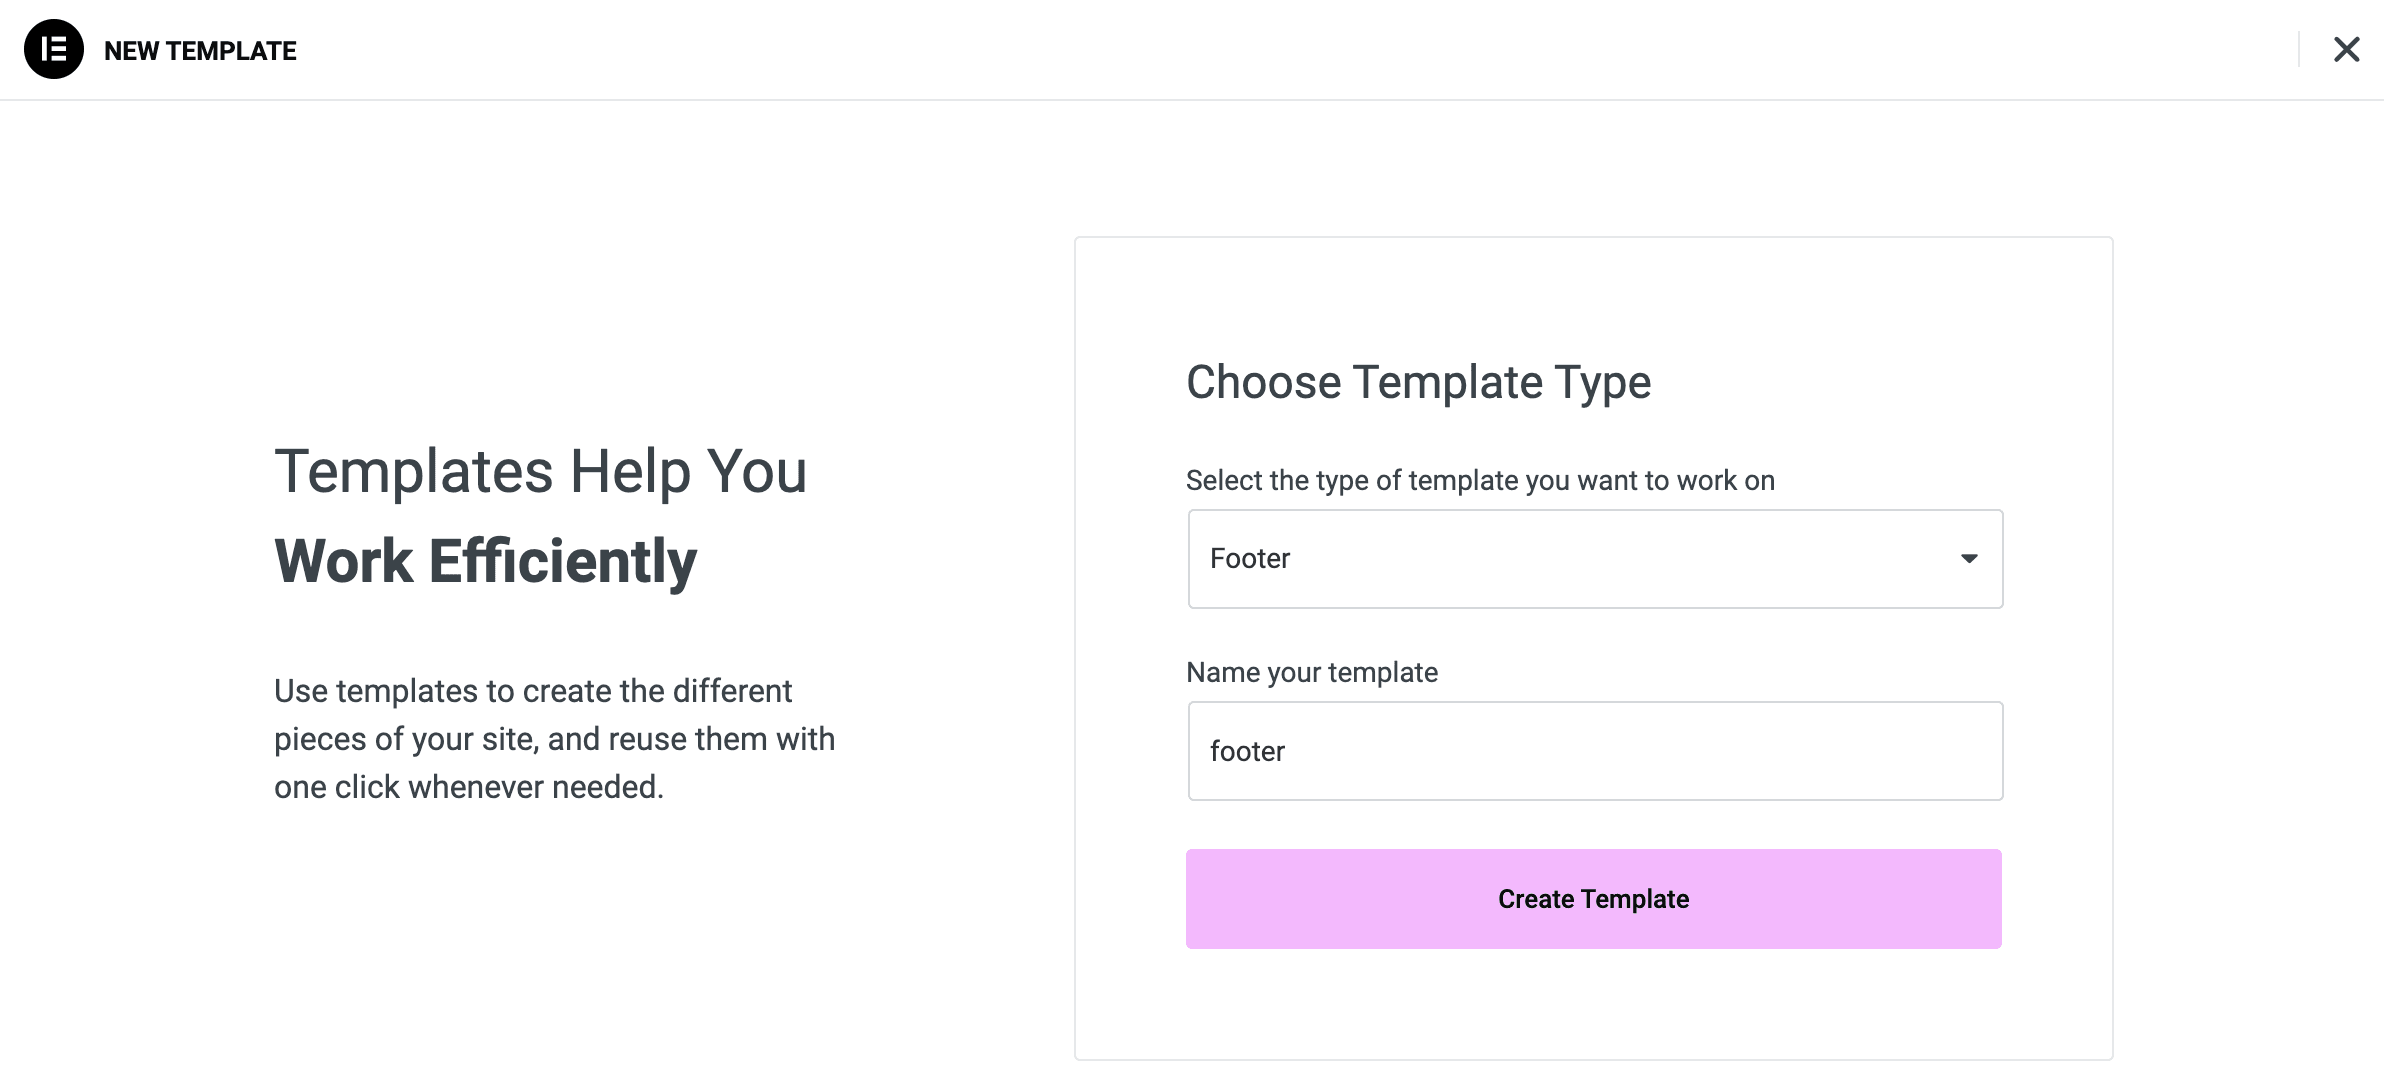
Within this template, we simply drag and drop the WPML Language Switcher widget into the footer area. Feel free to customize it according to your requirements.
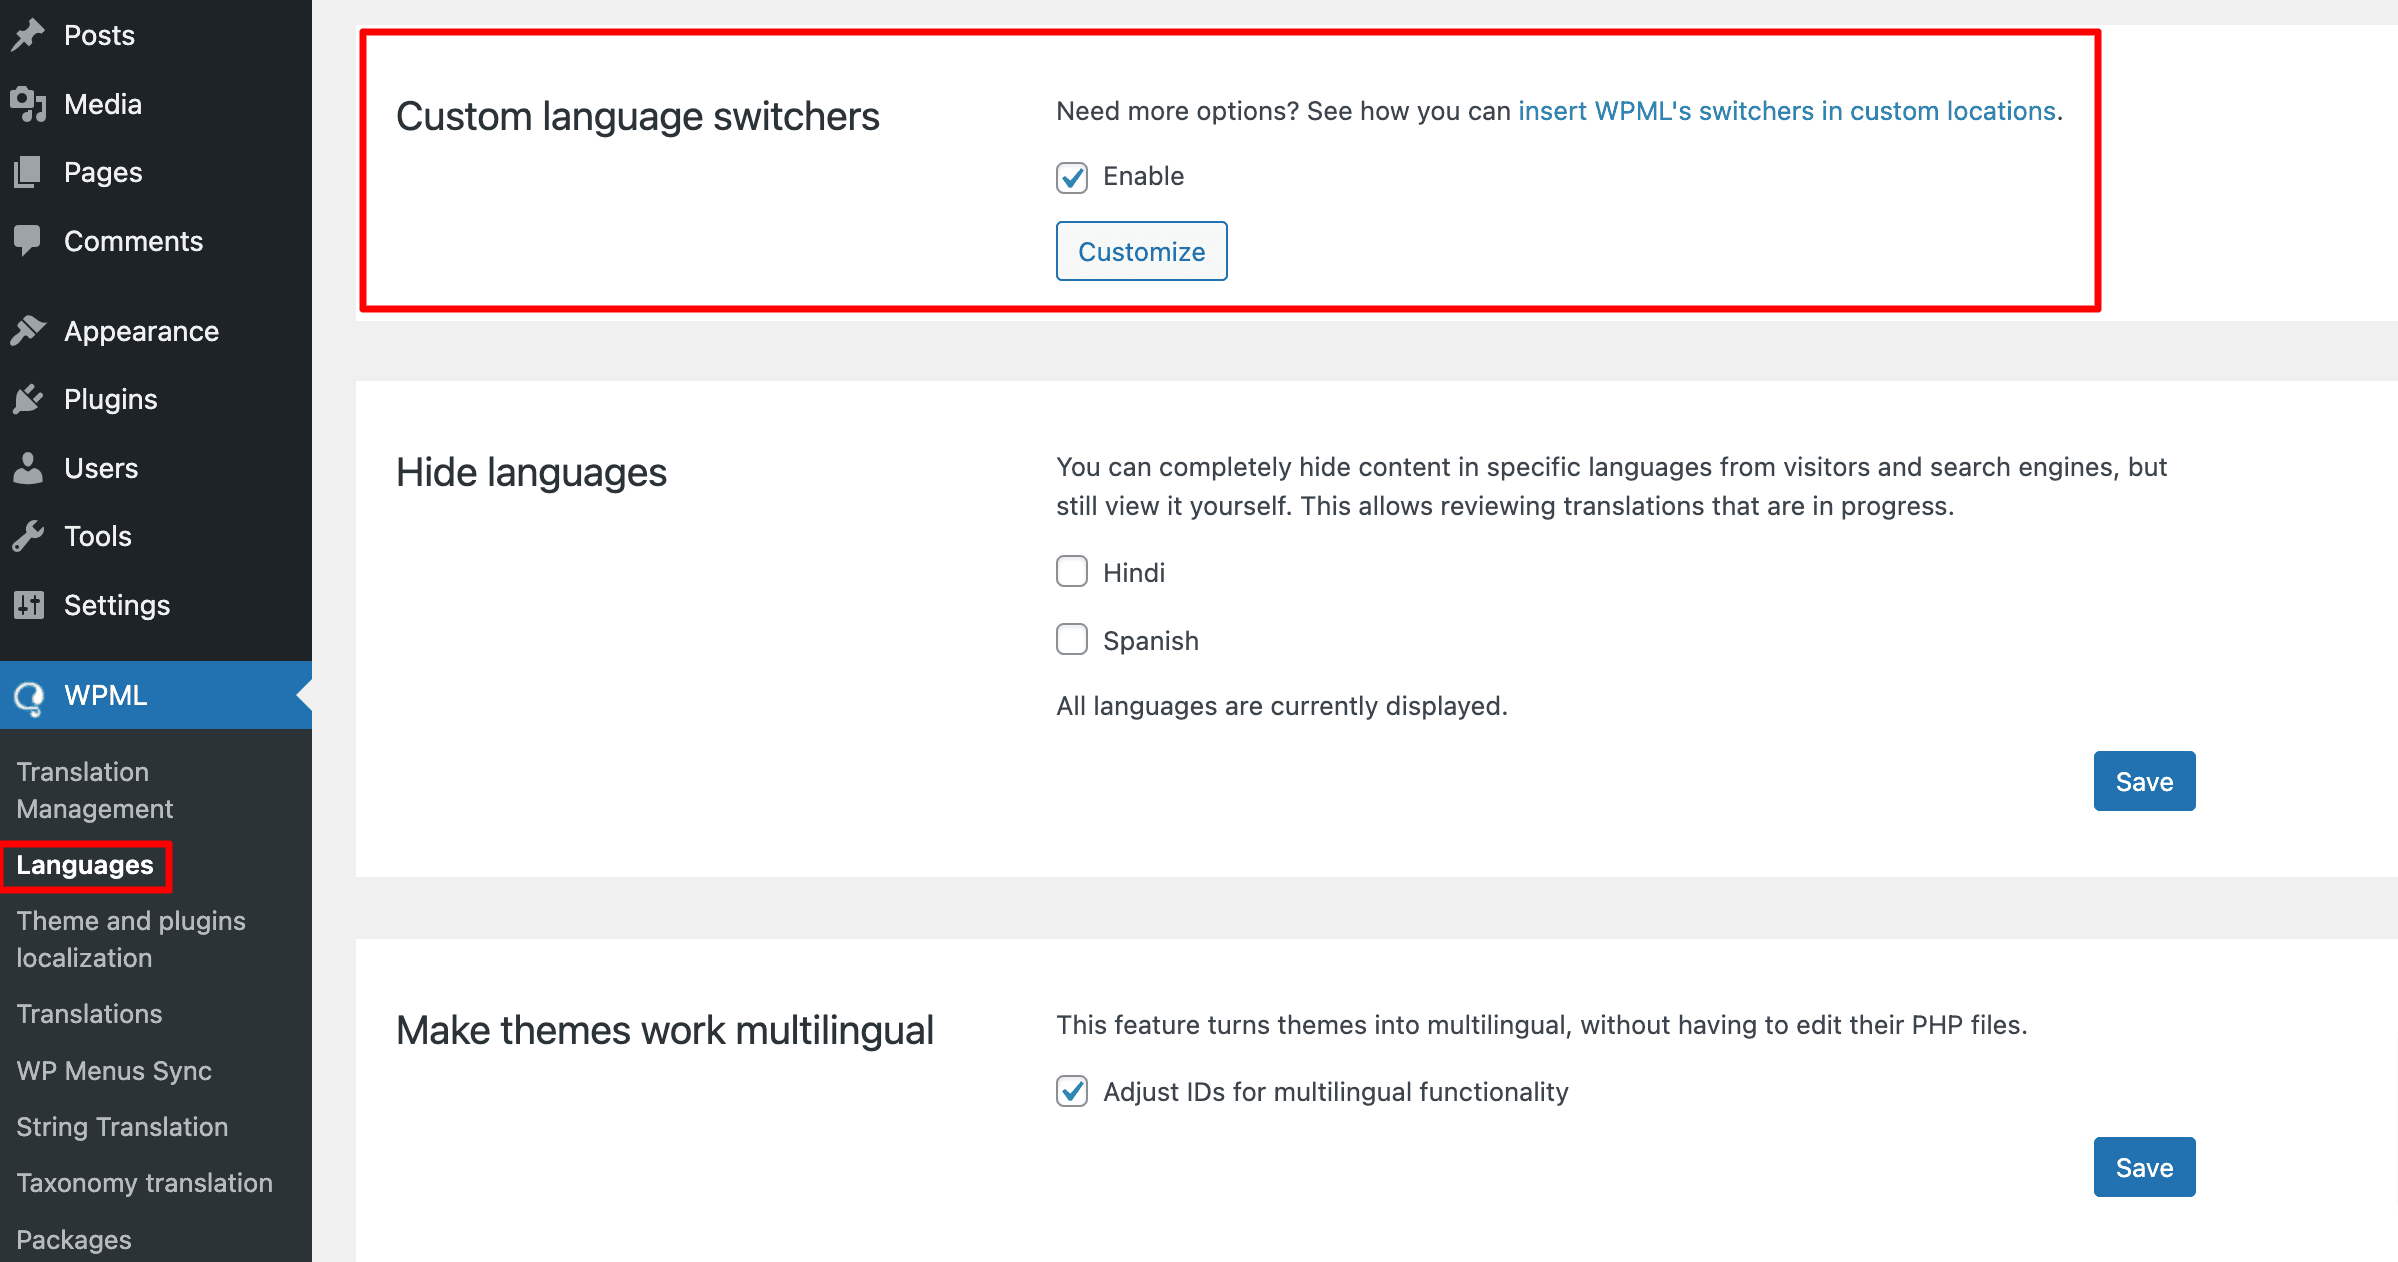
For any existing Footer language switcher present on our website, the option to remove it is straightforward. Navigate to WPML ➝ Languages ➝ Locate and deactivate the “Footer Language Switcher” option.

Now, the page appears as follows:
Customizing Language Switcher in WPML
With the Language Switcher feature in WPML, you can easily translate your content. This feature lets you add a language switcher in different styles to your elementor page. You have the flexibility to customize how it looks on your website. Not only can you set the theme for the switcher, but various customization options are also available.
This makes it simple for users to switch between languages while navigating your site. Whether you want a sleek design or a more personalized appearance, WPML’s Language Switcher feature makes it easy to tailor your language-switching experience to match your website’s style. It’s a user-friendly way to create a multilingual site without hassle!
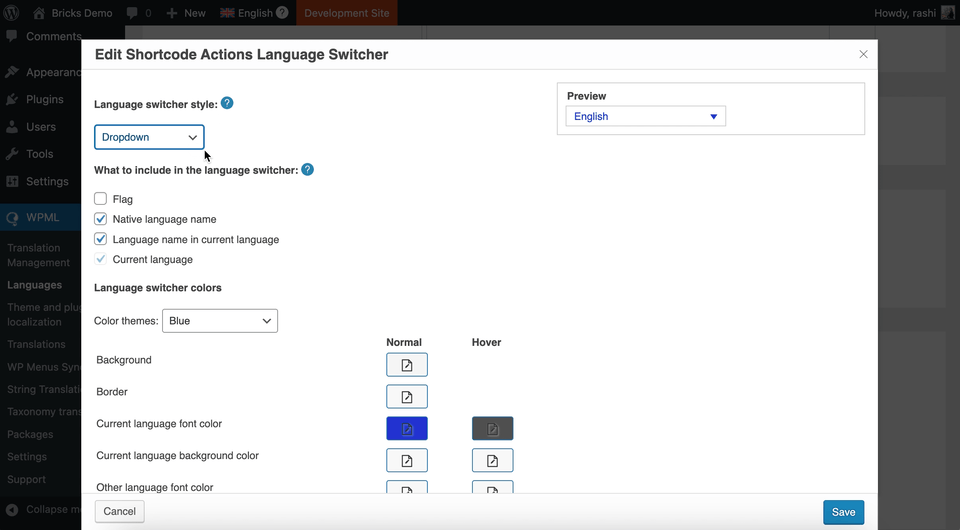
To personalize the language switcher, go to WPML ➝ Language. Look for the ‘Custom Language Switcher‘ option, enable it, and click the Customize button.
Click the ‘Customize‘ button, and a little box will pop up with options to make your language switcher look just the way you want! You can even customize it to match your style and preferences. Go ahead and customize it to make it uniquely yours.
Make Your WordPress Site Multilingual
In summary, WPML is a powerful tool that makes creating a multilingual website easy. You can translate various elements like posts, pages, menus, taxonomies, and more effortlessly. It also provides options for managing translations and even translating themes and plugins. With WPML, your website can reach a broader audience and offer a better experience to users in different languages.
FAQs on Creating Multilingual Website Using WPML & Elementor
What is WPML, and why should I use it?
WPML is a powerful WordPress plugin that turns your single-language site into a multilingual platform. It’s ideal for improving global reach, SEO, and user experience.
Do I need Elementor Pro to use WPML?
No, WPML works with both Elementor Free and Pro versions. However, Pro unlocks more advanced design options.
Is WPML a free plugin?
No, WPML is a premium plugin, but its robust features and multilingual capabilities justify the investment, especially for global reach and SEO.
Can I translate my website automatically with WPML?
Yes, WPML offers automatic translation using credits. You can also choose to translate content manually or assign it to team members.
Will WPML affect my website speed or SEO?
WPML is optimized for performance and supports SEO best practices like language-specific URLs and meta data, enhancing local SEO visibility.
Can I translate Anywhere Elementor templates with WPML?
Absolutely. WPML supports Anywhere Elementor templates and ensures that design and translated content stay aligned across all languages.
Is WPML suitable for large websites?
Definitely. WPML is scalable and reliable for large multilingual sites, including eCommerce, educational, and enterprise platforms.
What content can I translate using WPML?
You can translate pages, posts, categories, tags, navigation menus, theme/plugin strings, and even custom fields or WooCommerce content.
How do I manage translators on my site?
WPML allows you to assign roles to users (like translators or managers), so you can easily delegate and manage translation tasks.